Christchurch to Queenstown: 18 things to do on a road trip on New Zealand’s South Island

Lupin field near Lake Tekapo
We reached for the camera every time we turned a corner in New Zealand. Pretty soon, we were filming the entire road over the dashboard.
After a few road trips around the South Island, we’ve put together a list of our favourite things to do between Christchurch and Queenstown. This area is filled with unbelievable experiences in some of the most unique landscapes that New Zealand has to offer. In even a short amount of time, you can plan a trip around watching whales, sleeping under the stars, hiking on glaciers, running through fields of lupins, and making roadside stops at unbelievable mountains and lakes.
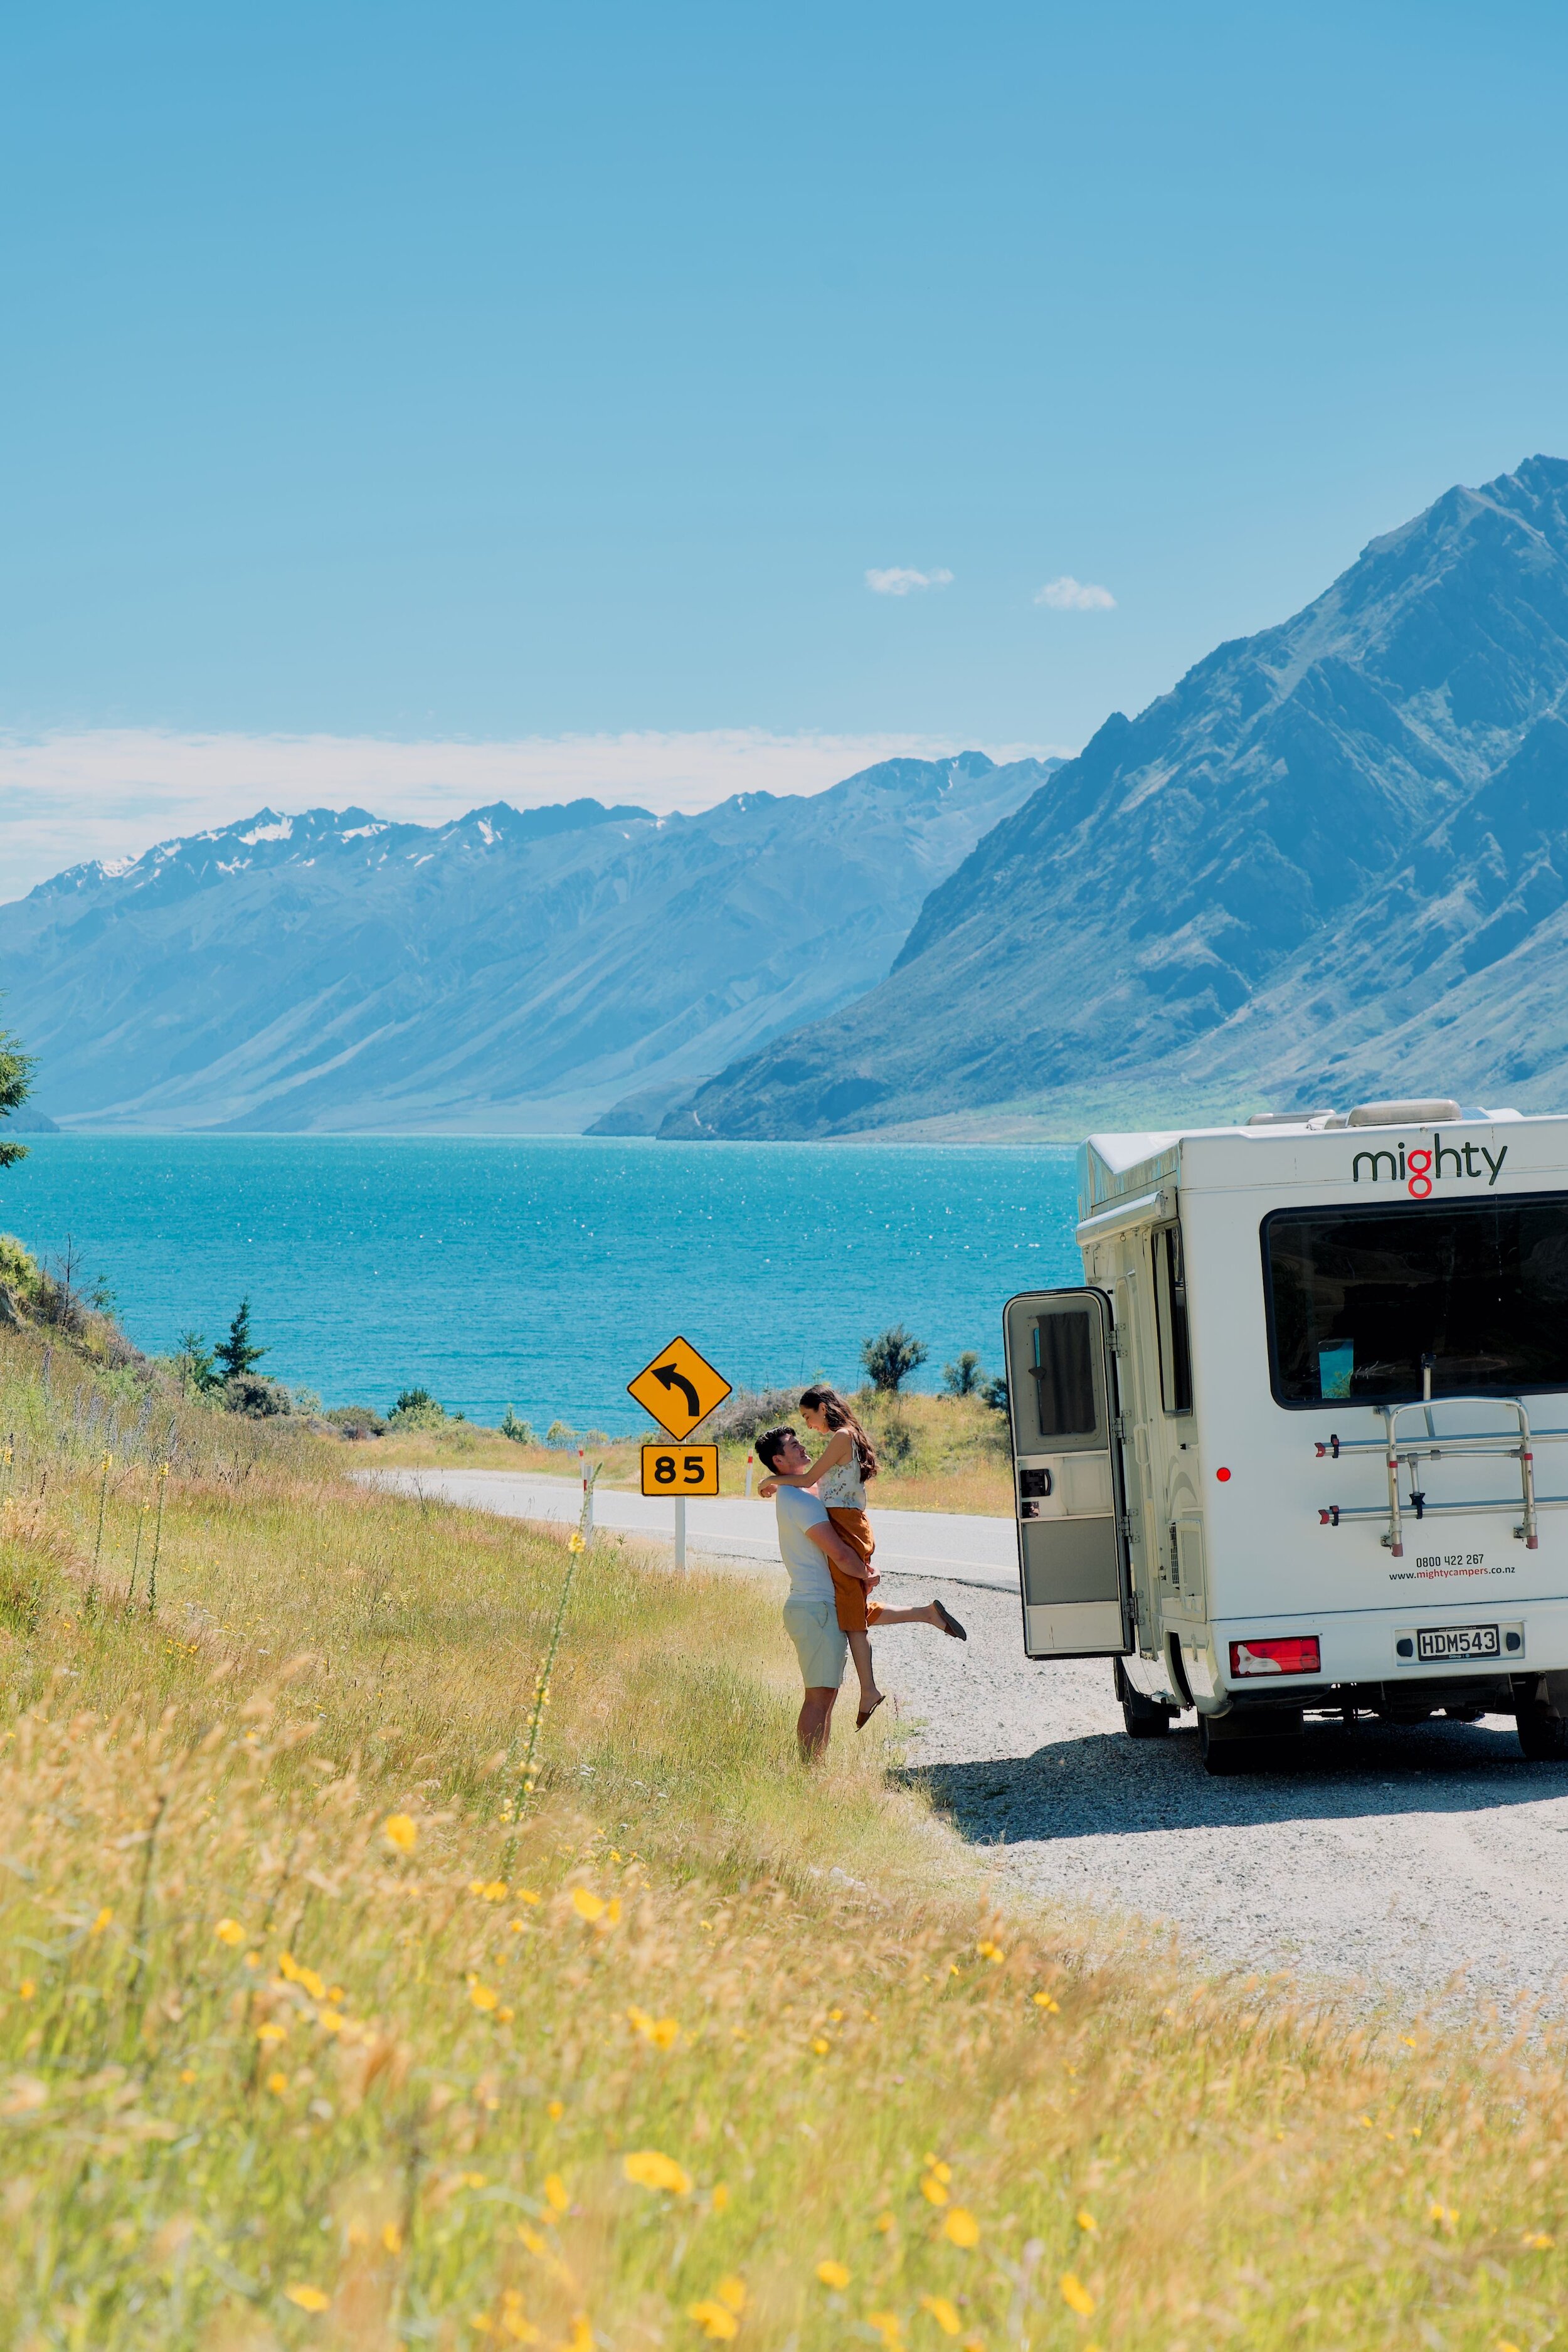
We’ve included options to see New Zealand’s South Island by car, motorhome or campervan. In case you won’t have a vehicle on the trip, we’ve also included tours from Christchurch and Queenstown to get to these destinations.

Wading in the waters of Hooker Lake (Hooker Valley Trail)

Flowers on the banks of Lake Ohau
ABOUT THE ROAD TRIP FROM CHRISTCHURCH TO QUEENSTOWN
HOW LONG TO SPEND ON A SOUTH ISLAND ROAD TRIP
We’ve spent around 2-3 weeks on each trip. Depending on how long you have, we’d recommend stopping at at least three main places: Lake Tekapo, Aroaki Mount Cook National Park and Wanaka. Many of the diverse landscapes in this area can be seen comfortably on a 10 day road trip.
If you have more time, we’d also recommend going to Kaikōura (north of Christchurch) for a unique coastal getaway. If you’re planning a shorter trip, we’d recommend spending most of your time near Queenstown. Many of the locations listed (other than Kaikōura) can even be reached as day trips from Queenstown.
This post isn’t intended to be a day-by-day itinerary for a road trip from Christchurch to Queenstown—it’s simply a list of things to see between the two towns that you can pick and choose at your own pace.
HOW TO GET AROUND ON A ROAD TRIP FROM CHRISTCHURCH TO QUEENSTOWN
By Tour
If you aren’t hiring a vehicle on the South Island, we’d recommend joining an all-inclusive tour of the South Island. We’ve researched a lot of companies and found that TourRadar has the most options for arrival dates and locations, and different trip lengths. We’ve also included options below for each destination where there are day trips available from Christchurch or Queenstown, or one-way transfers between regions.
BY CAR
The benefit of having a car is the flexibility it gives you to stay in comfortable accommodation along the way and hassle-free parking that is available everywhere. However, it’s also one of the more expensive ways to travel once you add up accommodation and petrol.
We hired our car through Rentalcars.com which compares prices across the car hire companies. Most rental companies will allow you to hire a vehicle at Christchurch airport and return it to Queenstown airport. A standard car hire is all you need for this road trip; the roads in New Zealand are well-maintained and none of our recommendations need an off-road vehicle to access them.

Road near the Hooker Valley, Mount Cook
BY CAMPERVAN or motorhome
New Zealand is one of the best places in the world to travel in a motorhome or campervan. Our first road trip here was by motorhome, and it was one of the most memorable experiences. There are plenty of campsites on the South Island and most carparks in the towns have parking space for campervans and motorhomes. New Zealand also has pretty relaxed Freedom Camping laws, but we’d recommend reading New Zealand Tourism’s Responsible Freedom Camping guide and using their apps to find campsites.
The downside of planning a road trip by campervan or motorhome is that the speed limit is often capped for these vehicles, so travelling between places might take longer. New Zealand’s roads also have some sharp turns that you need to drive slowly through or, in some cases, campervans and motorhomes are prohibited, forcing you to take a longer route.
The side of the road around Lake Hawea
THINGS TO DO ON A ROAD TRIP FROM CHRISTCHURCH TO QUEENSTOWN
PART ONE:
CHRISTCHURCH TO LAKE TEKAPO
After arriving in Christchurch, the first part of the road trip to Lake Tekapo passes the most beautiful lakes. If you’d like to see the area on a tour, we’d recommend joining this day trip from Christchurch which stops at Lake Tekapo, or taking this one way tour to Aoraki Mount Cook if you want to stay in the area afterwards (there are other options to take you further along the route, like this one-way tour from Aoraki Mount Cook to Queenstown). If you have time, we highly recommend taking a slight detour to Kaikōura to experience an incredible marine ecosystem, sleep in a glass cabin, or hike in New Zealand’s Southern Alps.
Our recommendations for the area between Christchurch and Lake Tekapo are:
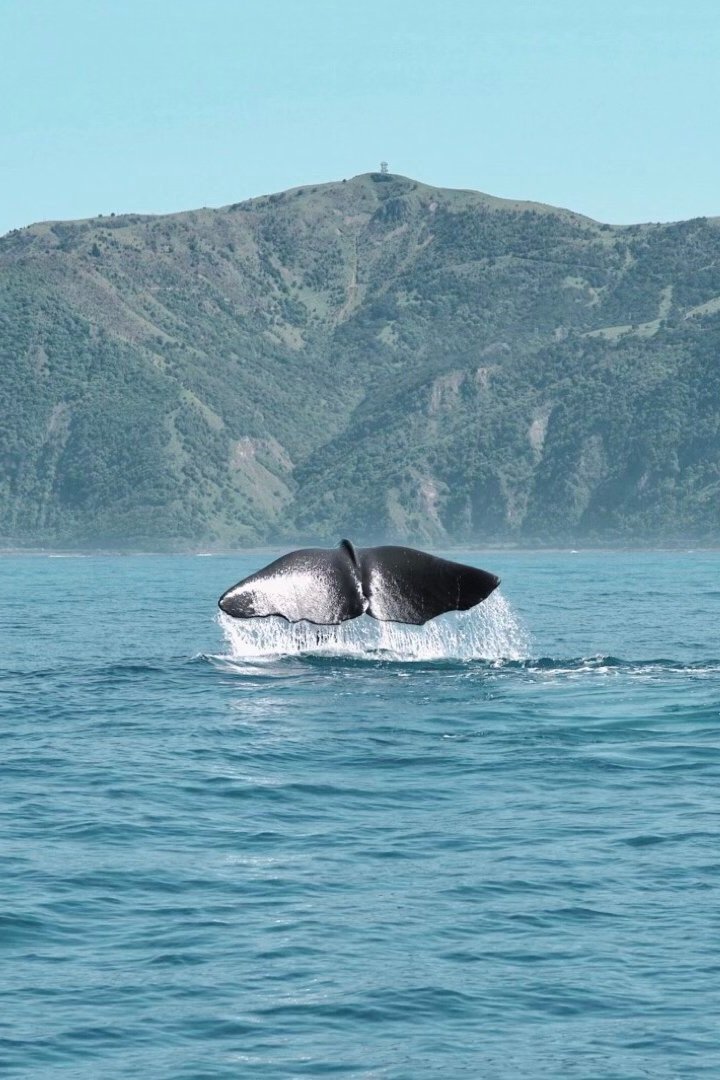
1. WHALE WATCH IN KAIKOURA
All year round
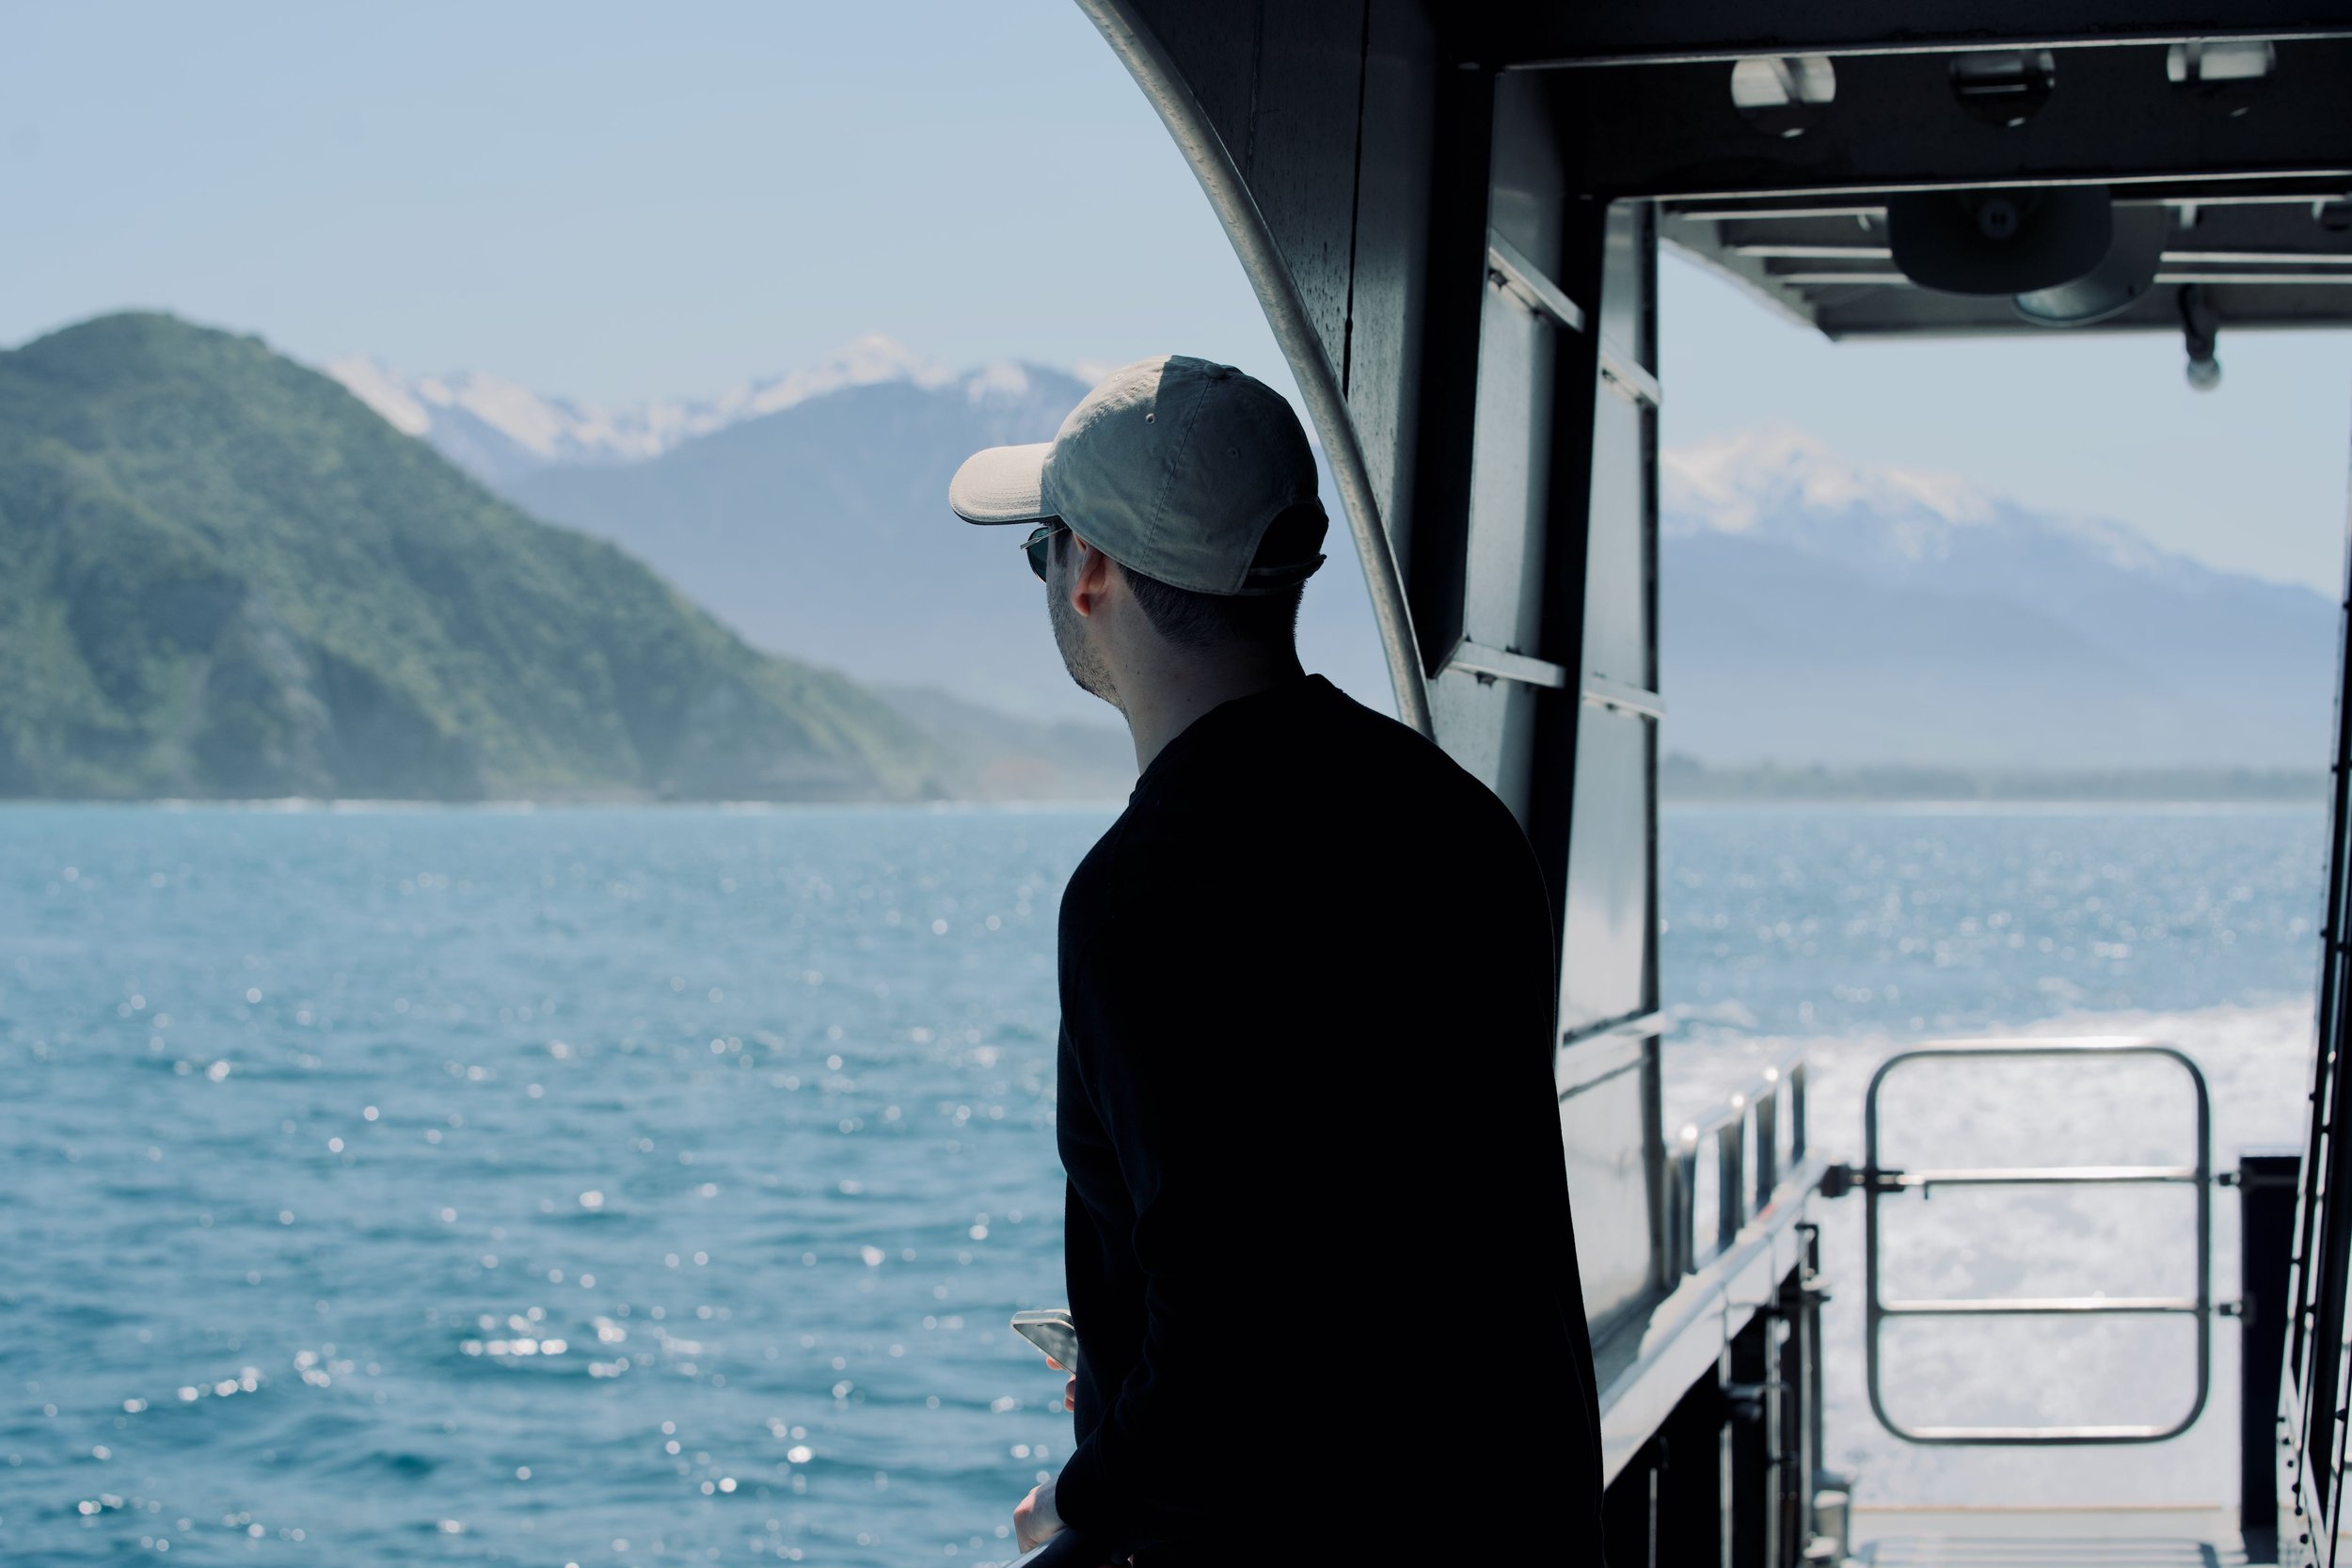
Kaikōura is a stunning coastal town only two and half hours’ drive from Christchurch, and it’s one of the rare places in the world where you can see whales all year round. This part of the island is on the edge of a tectonic plate, with huge underwater canyons just off the coast. Sperm whales dive and hunt in the deep water before resurfacing to breathe in the bay. The wildlife in this region is perfect for nature lovers.
If you want to get close to sperm whales and other marine animals, we took this whale watching cruise which generally spots 2 whales on each trip. Sperm whales make one of the loudest sounds of all animals to navigate, communicate, hunt, stun and kill prey. The cruise guides use hydrophones to hear their clicks from kilometres away, and then sail over as quickly as possible.
Whales can also be seen from the air on a 30 minute scenic flight around Kaikōura. Longer flight options are also available on GetYourGuide, like this one which includes two alpine landings.
Whale watching in Kaikōura

Beach views in Kaikōura
Whale watching in Kaikōura
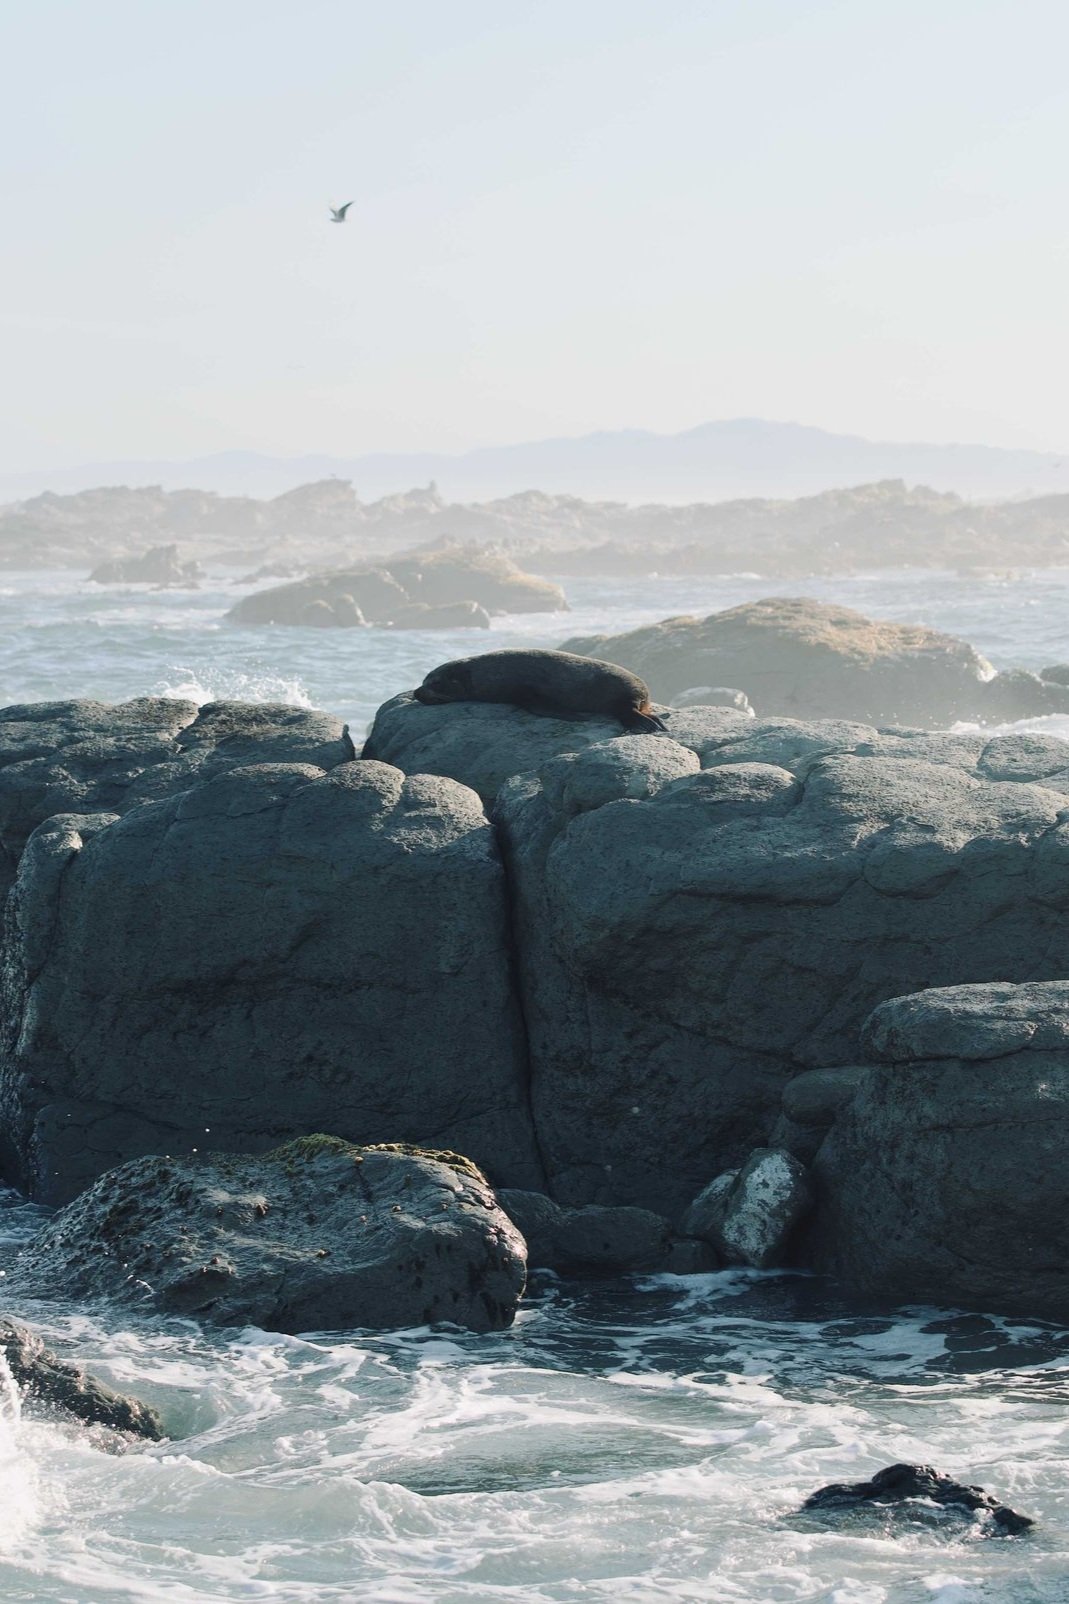
2. VISIT A SEAL COLONY ON THE PENINSULA WALK
Distance: 11.7km return
Time: 3 hours
Difficulty: Easy
One of the most beautiful coastal walks on the South Island of New Zealand is the Peninsula Walkway near Kaikōura. Other than one hill at the start, the walk follows a flat trail for 11.7 km along the ocean. It can be split into smaller sections or you can complete the full loop track in about 3 hours.
The start of the Peninsula Walkway is a popular seal spotting area. Seal colonies love to play around and rest on the rocks at the base of the cliff. Seal pups can usually be seen here between April and September. You don’t need to walk too far to find them—park at the carpark at Fyffe Quay near the Point Kean Viewpoint and then walk around the two headlands by the shore.
There are also unique opportunities to get close to seals and dolphins in Kaikōura. To access the water, we’d recommend taking a half-day kayak trip, a sunset kayak trip, or going out on pedal boats. If you’re travelling with kids, this kayaking tour is perfect for families to take two-person kayaks to the fur seals.

Visiting a seal colony at Point Kean Viewpoint (Kaikōura)
Visiting a seal colony at Point Kean Viewpoint (Kaikōura)
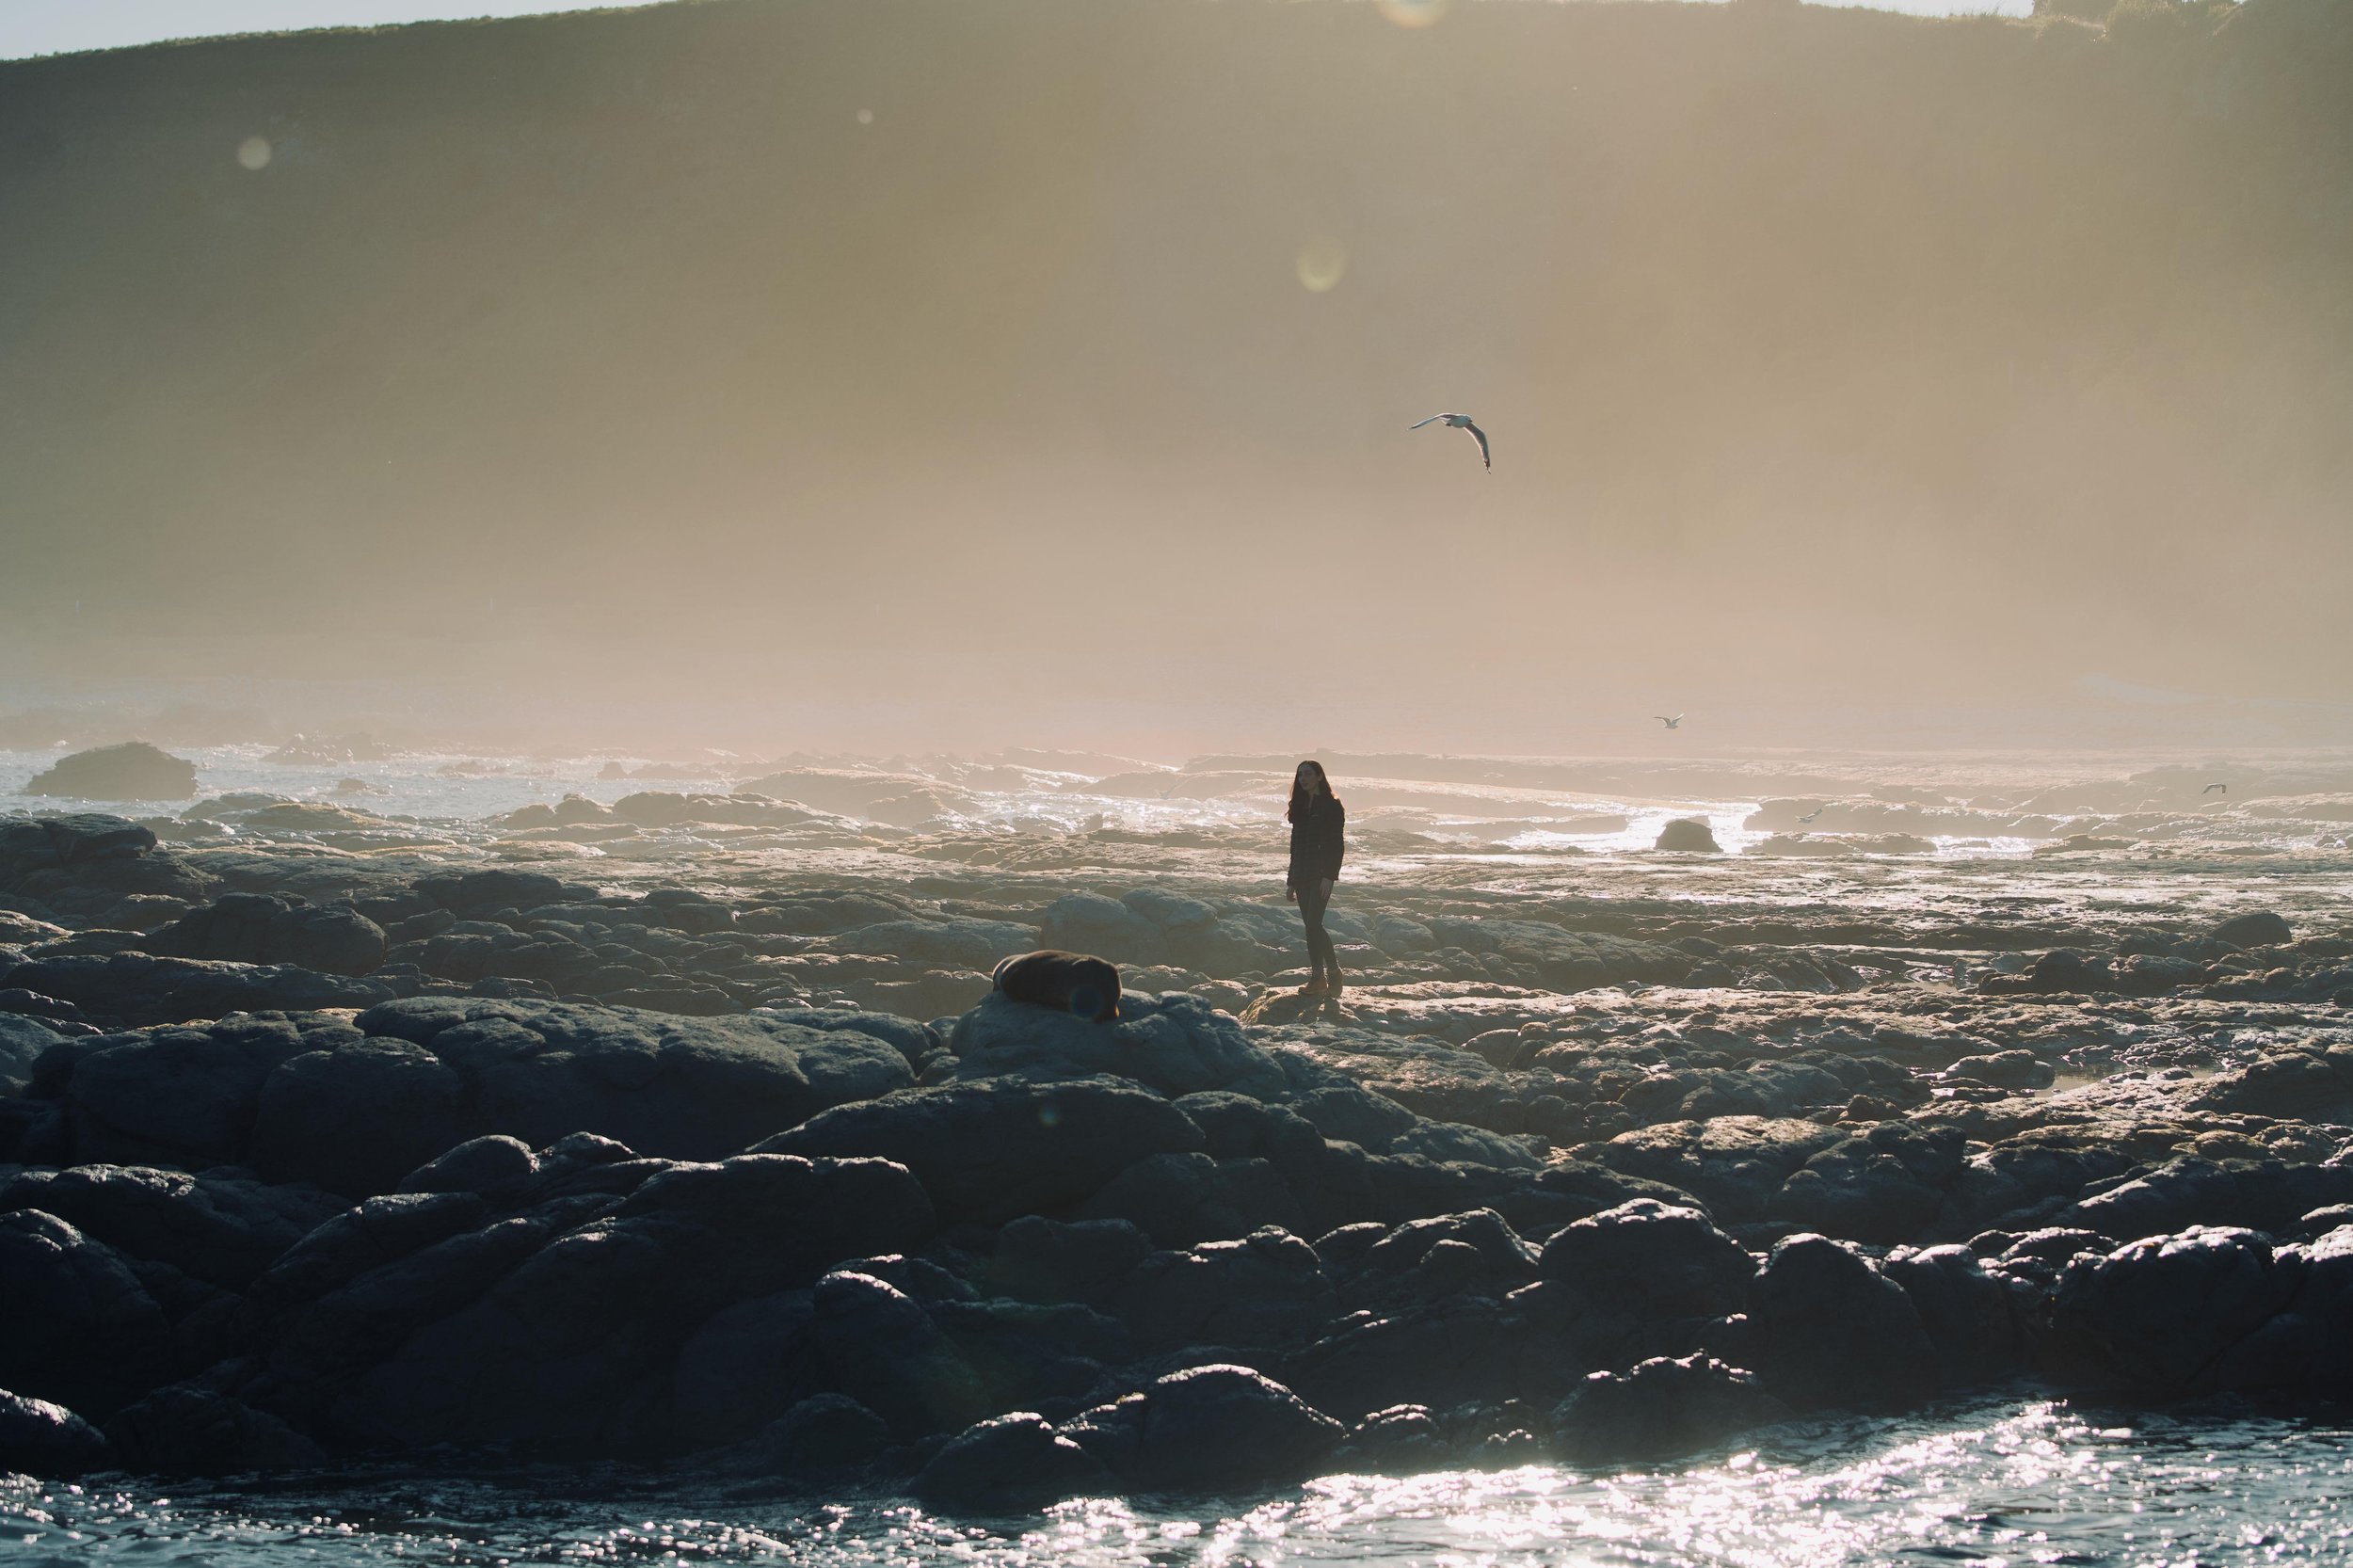
Visiting a seal colony at Point Kean Viewpoint (Kaikōura)
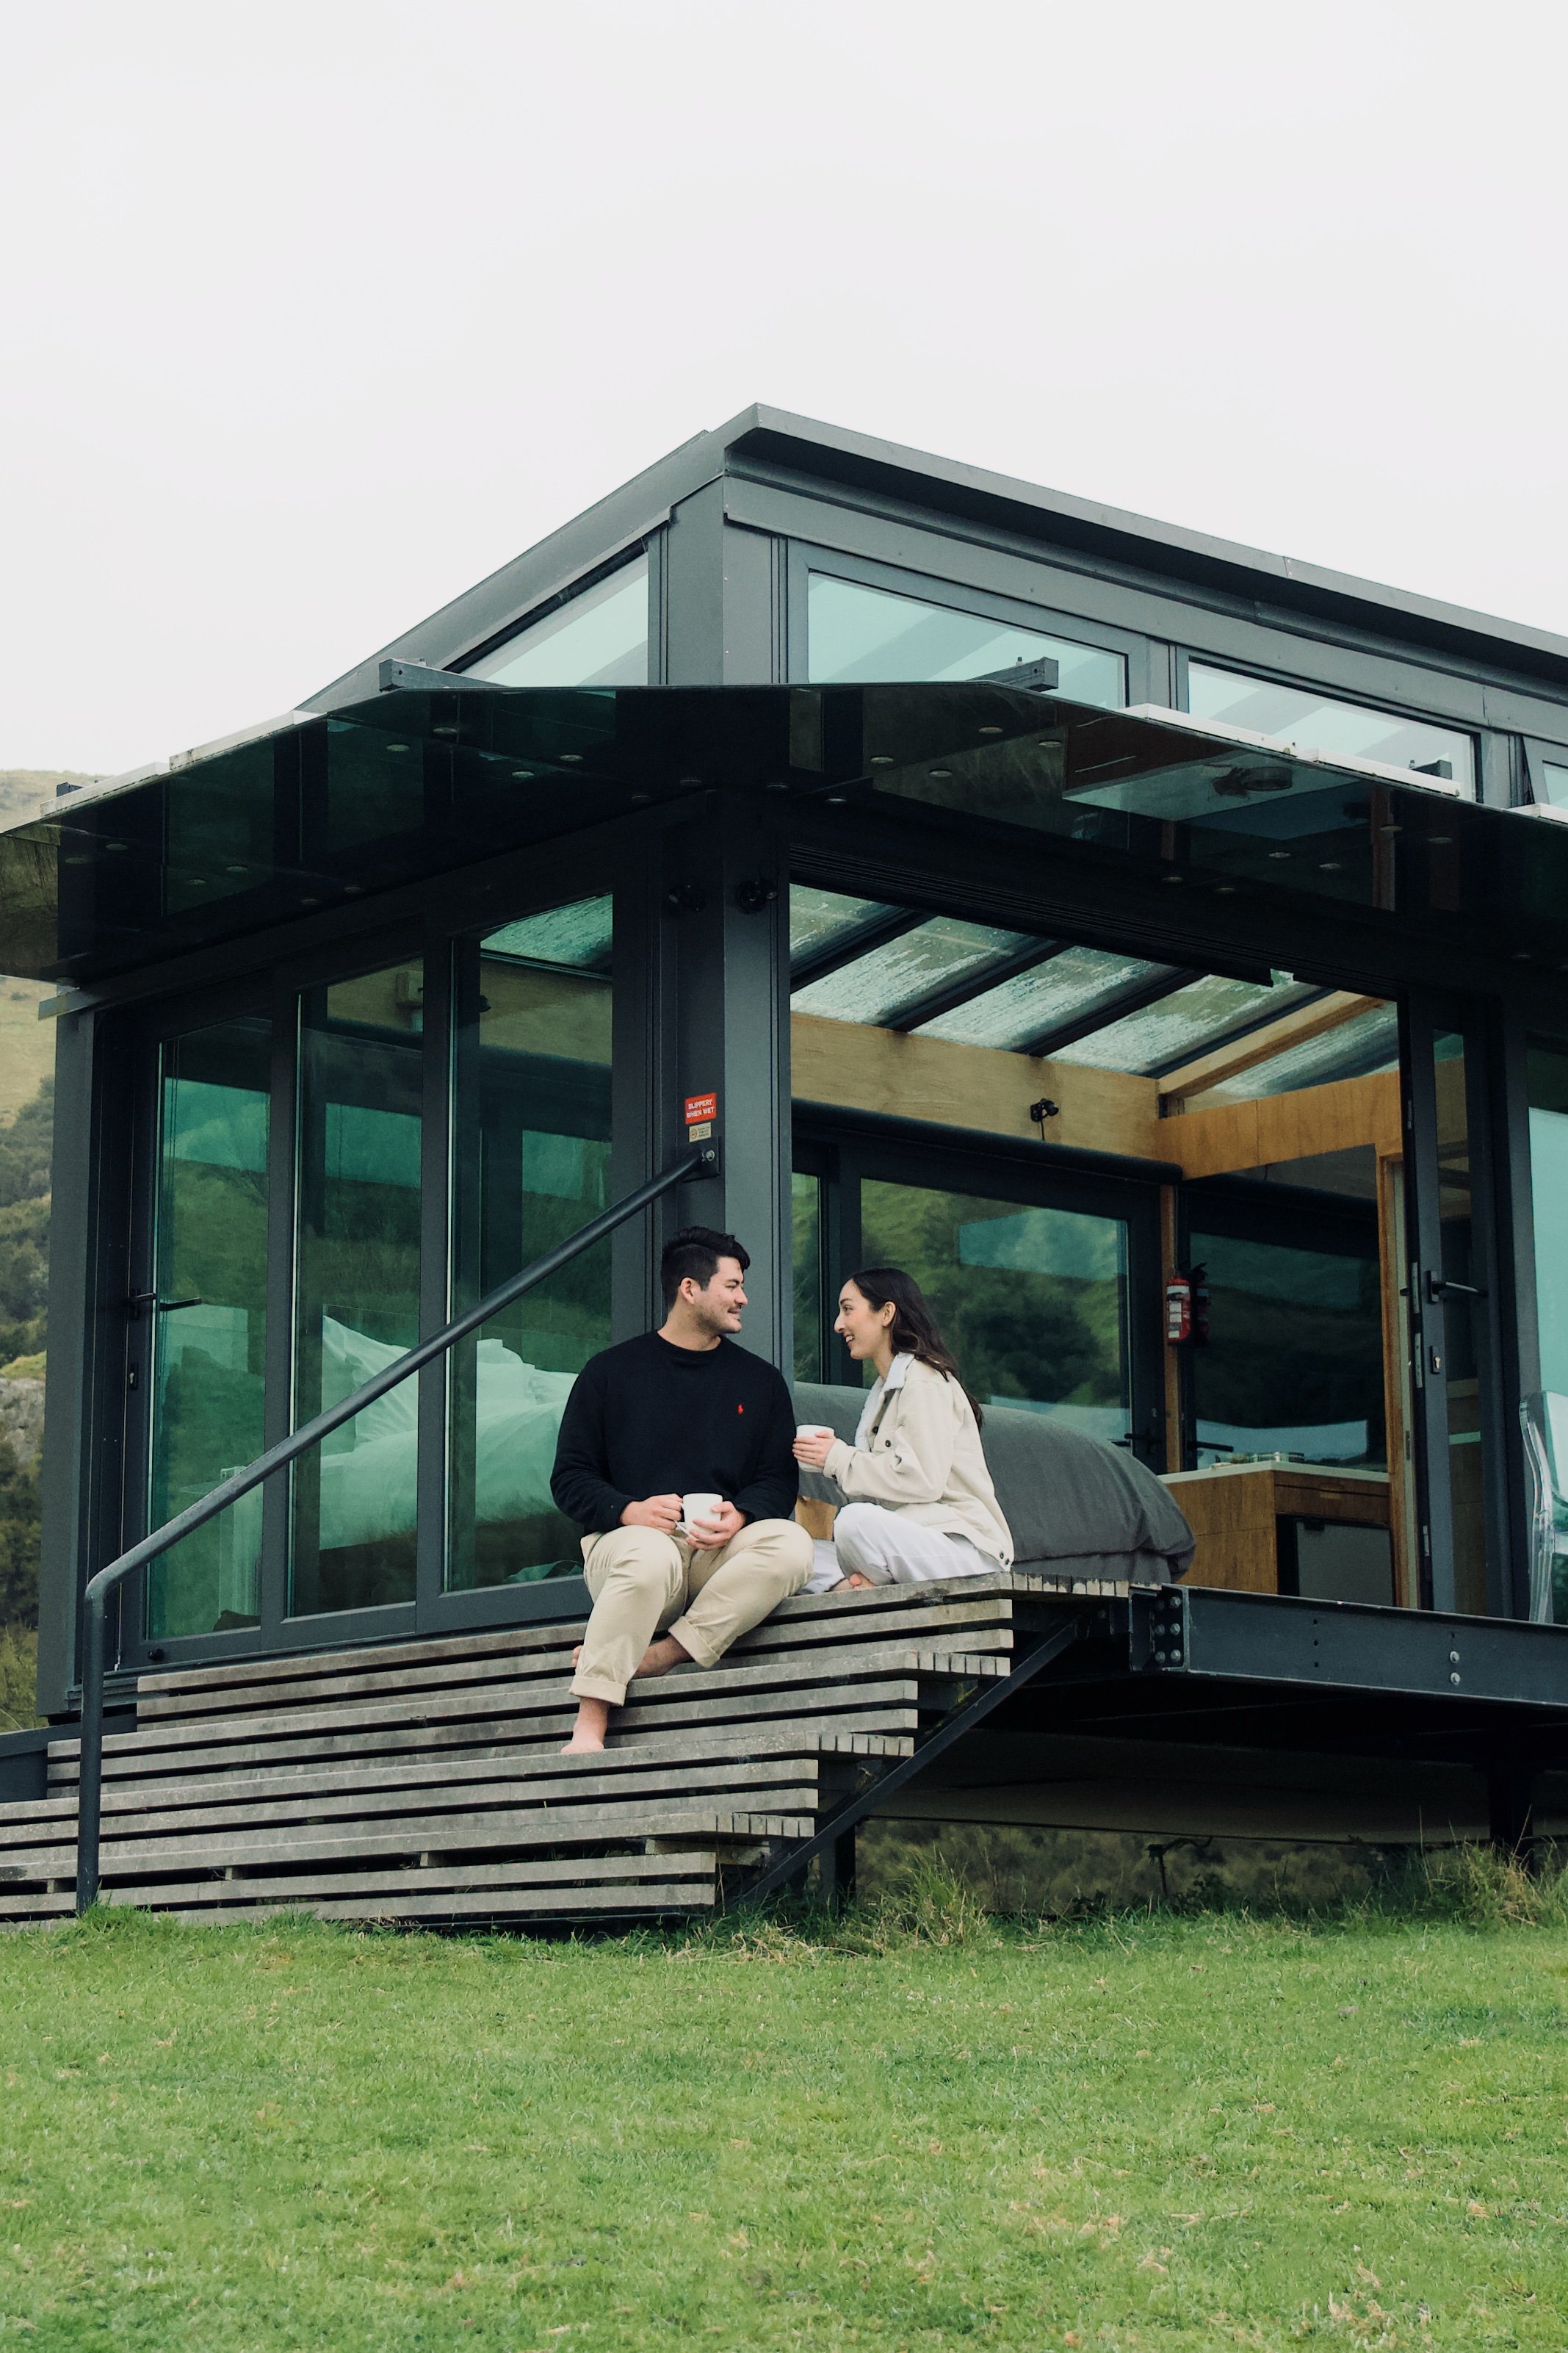
3. STAY IN A PUREPOD IN KAIKOURA
We want to be immersed in nature as often as possible. For a few days in Kaikōura, we had the chance to experience this, with so much taking place between the sea and sky. Even when we went inside, there was little separation from the outdoors because we slept in a cabin made of glass.
PurePods are glass cabins that have been built around New Zealand in some of the most beautiful locations. On the south island, you can find them in:
Kaikōura: Manakau PurePod and Kahutara PurePod
Stewart Island: Hananui PurePod and Tokoeka PurePod
Waipara: Greystone PurePod
Central Otago: Haurapa PurePod and Tāima PurePod
Greta Valley: Korimako PurePod
Port Levy: Pōhue PurePod
PurePods are focused on slow, sustainable travel and linked to conservation or regeneration projects. Even though they are off-grid, the cabins have everything you need from hot water to heating, a fridge, bbq, stove and a complete bathroom and shower.
We decided to stay in the Manakau PurePod in Kaikōura. To get there, we walked through a small forest of kanuka trees, which are an important part of recovering the area from deforestation. The kilometre-long walk in made us feel so far from everything else—surrounded only by Southern Alps. We have a vlog of the experience here:
The glass cabins book out quite far in advance, so we’d recommend checking the availability for your destination early on Booking.com (which offers free cancellation for a period) and reserving the cabins for 1-2 nights:

Walking into the Manukau PurePod
Manukau PurePod

View from the Manukau Purepod
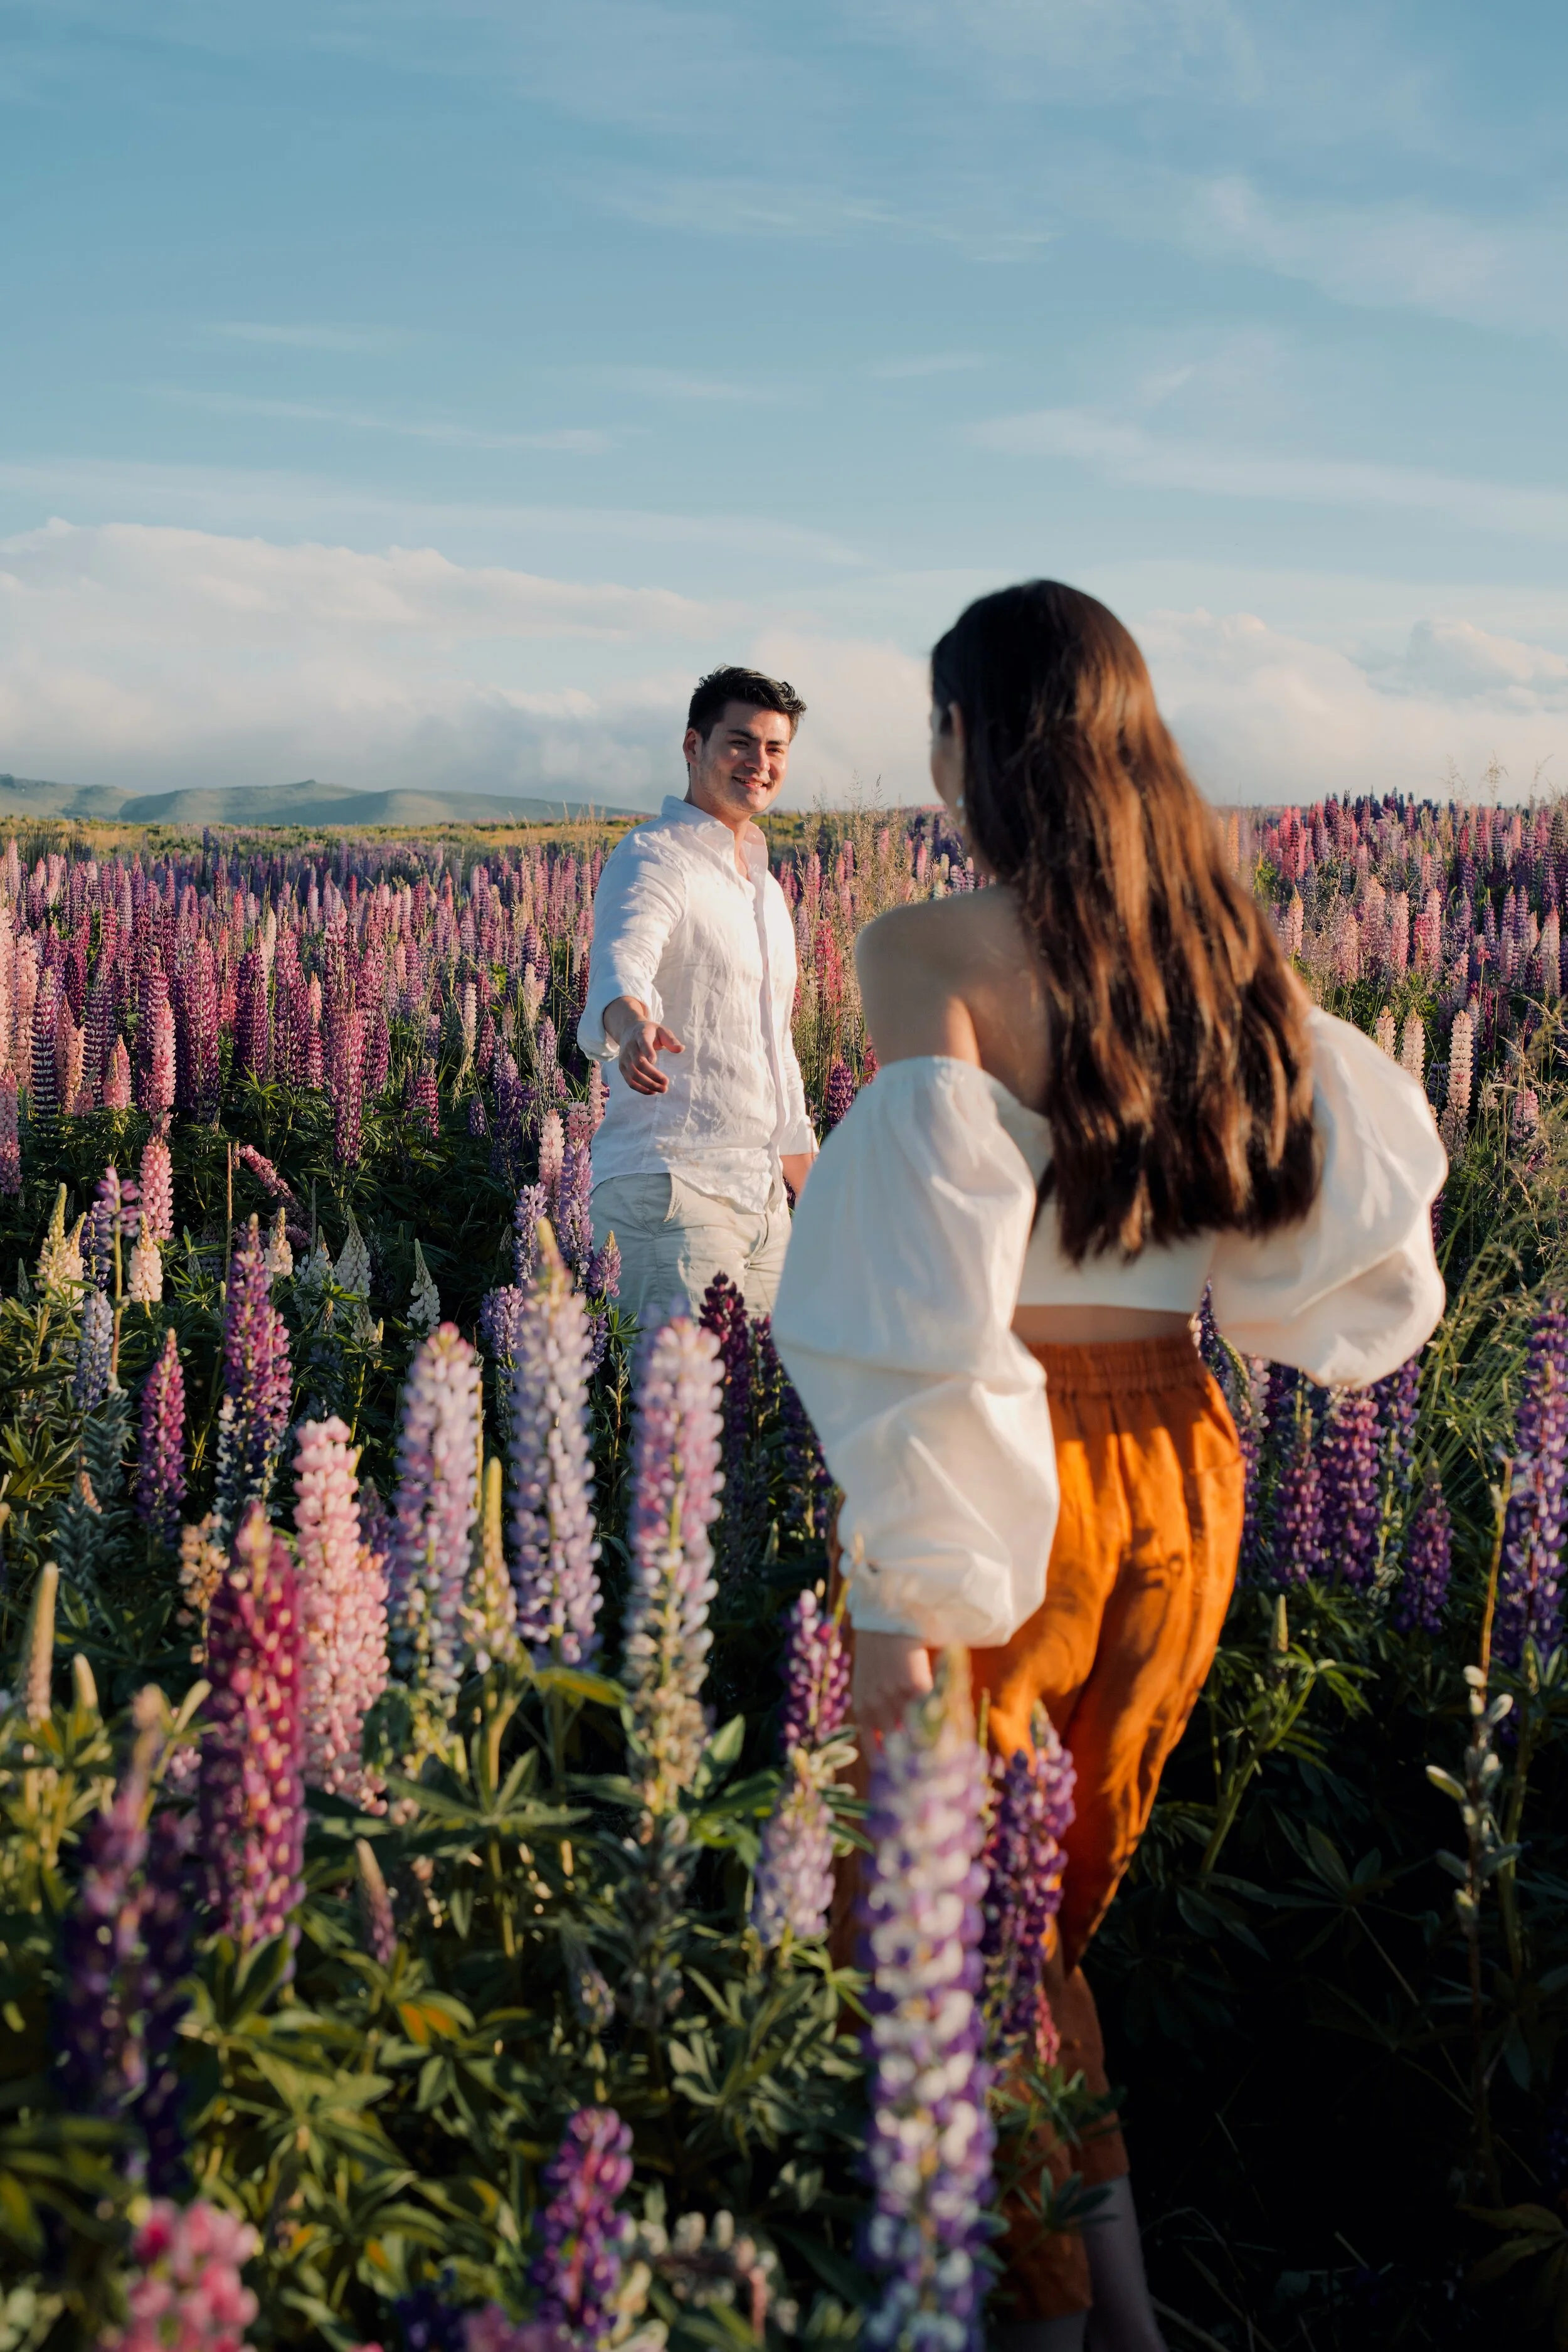
4. FIND A FIELD OF LUPINS AT LAKE TEKAPO
In bloom Nov - Dec
When we left for our road trip, someone told us that there was something magic about Lake Tekapo. We understood as soon as we arrived and the lake was lined with lupins. The lupins bloom around the South Island from spring to summer (September to February) each year. Lake Tekapo is one of the most beautiful places to find them, and they usually flourish in this area from late November to December.
One popular spot is a field in front of the Church of the Good Shepherd, which has the lake and mountains right behind it. If you’re staying at Lake Tekapo, this is also a popular stargazing area and an amazing foreground subject for astrophotographers. This day trip from Christchurch to Mount Cook is the best way to get to this view if you don’t have your own vehicle on the trip.
Another popular lupin field is just behind Lake Tekapo Regional Park, backed by huge trees and hills in the distance. Access to this field is not as direct as it is on a gravel roadside, so make sure it’s safe to pull over. You’ll generally be able to find areas with lupins all around the banks of Lake Tekapo. If you are after some fields that might be less crowded than the usual spots, you can walk or drive around the lake in November or December.
Lupin fields in Lake Tekapo

Lupin fields in Lake Tekapo
5. HIKE THE MOUNT JOHN WALKWAY CIRCUIT AROUND LAKE TEKAPO
Distance: 8km circuit
Time: 3 hours
Difficulty: Easy
If you're looking to immerse yourself in the beauty of Lake Tekapo, the Mount John Walkway Circuit is an incredible way to do it. The trail leads to panoramic views of the turquoise lake and snow-capped mountains, with the full size and grandeur of Lake Tekapo visible for the majority of the hike. The trail starts at a carpark near the Tekapo Springs (MAP HERE).
You can follow the Mount John Walkway Trail circuit clockwise or anti-clockwise. The main difference between the two is the incline. We did the trail clockwise, which starts with a short but steep hike through a small hillside forest. If you’re lucky, you might be able to spot some of New Zealand’s bird species like the kea and bellbird. After the forest, there’s a bit more of an incline to reach the summit of Mount John, but by this time you’ll have covered about 2km (about a quarter of the trail) and most of the path from there will be either flat or down hill. If you were to take the trail anti-clockwise, you would enjoy a flat start around the banks of Lake Tekapo and slowly ascend to Mount John. The ascent is longer anti-clockwise, but less of an incline.
At the summit of Mount John, the Mount John Observatory is run by the University of Canterbury and the Dark Sky Project. If you don’t want to hike, you can also drive right up to this observatory during opening hours. The Dark Sky Project also runs stargazing tours in Lake Tekapo at night.
Lake Tekapo from Mount John Walkway

Mount John Walkway

Lake Tekapo from Mount John Walkway
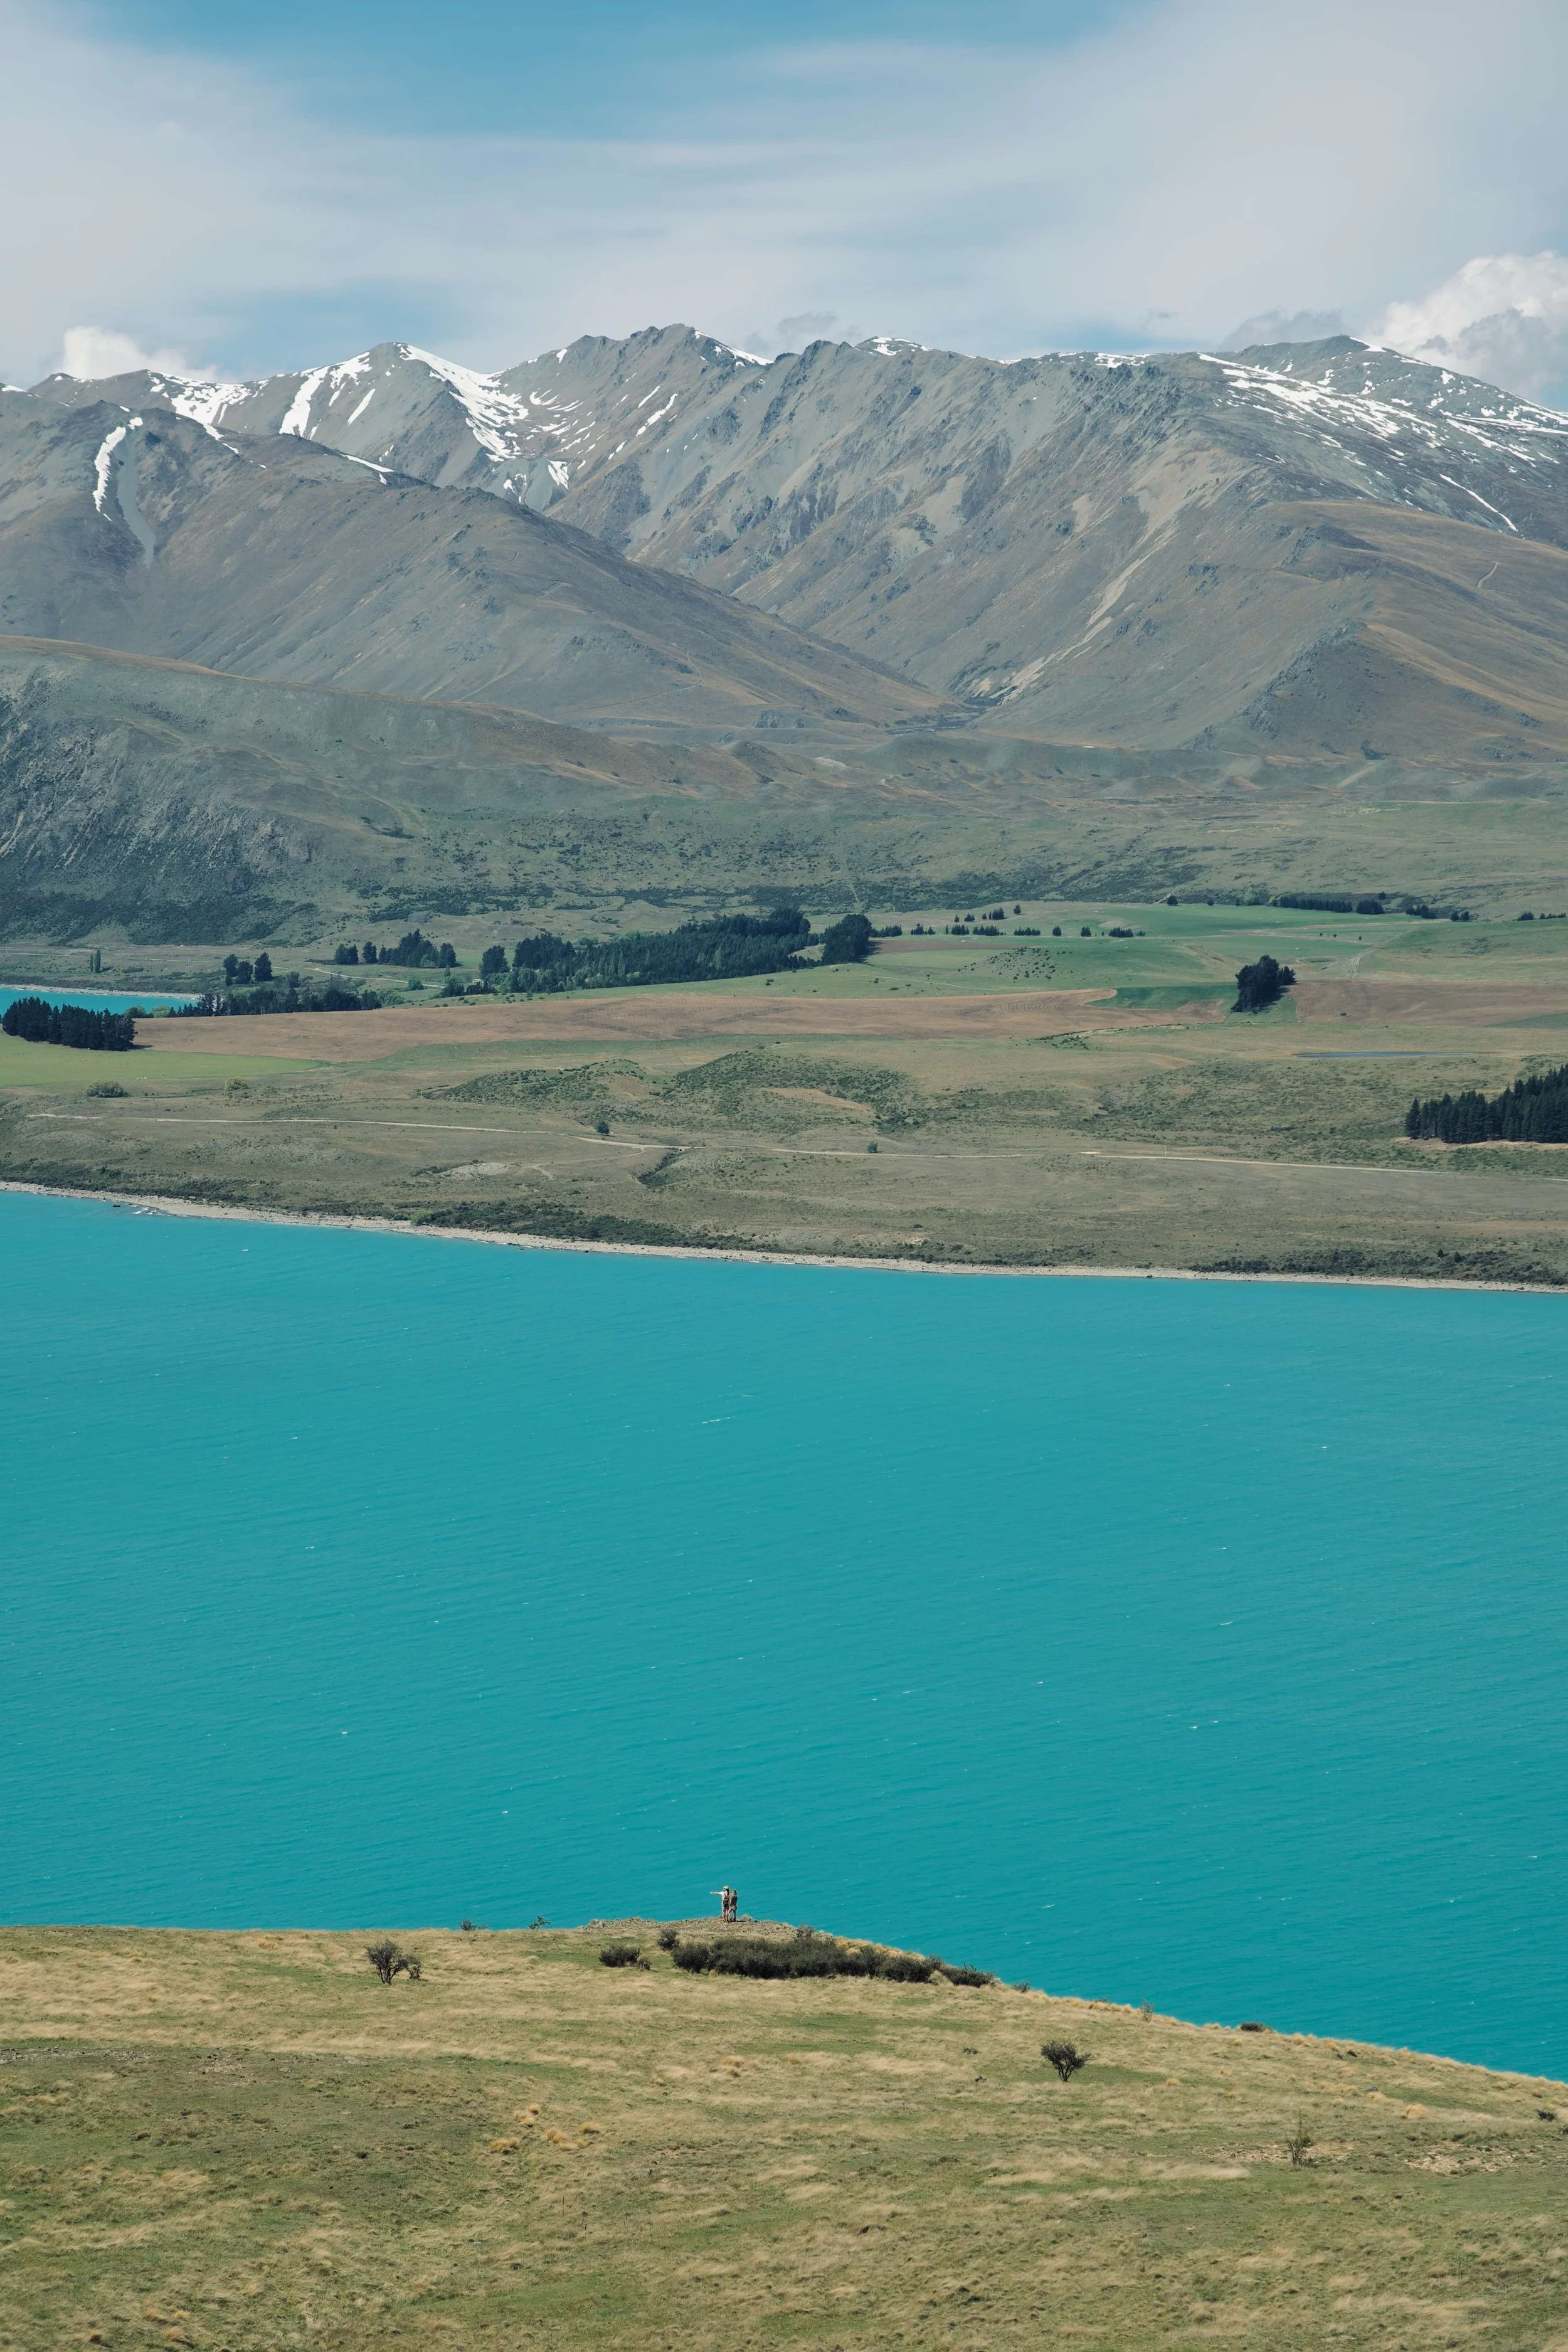
6. SWIM IN GLACIER WATER AT LAKE PUKAKI
Taking a road trip from Christchurch to Queenstown can be quite slow because there are so many places to pull over. The route to Aoraki Mount Cook National Park becomes very scenic when it starts to follow the shores of Lake Pukaki. On a sunny day, the waters of Lake Pukaki are a striking pale blue, while the snow-capped peaks of Aoraki Mount Cook loom in the distance. If you’re feeling hot, you can go for a swim in its glacial waters—freezing all year round, of course. Otherwise, it’s the perfect place to pull up for a lakeside picnic (MAP HERE).
If you don’t have your own vehicle on the trip, this day trip from Christchurch or this day trip from Queenstown is the best way to get to Lake Pukaki.

Shore of Lake Pukaki
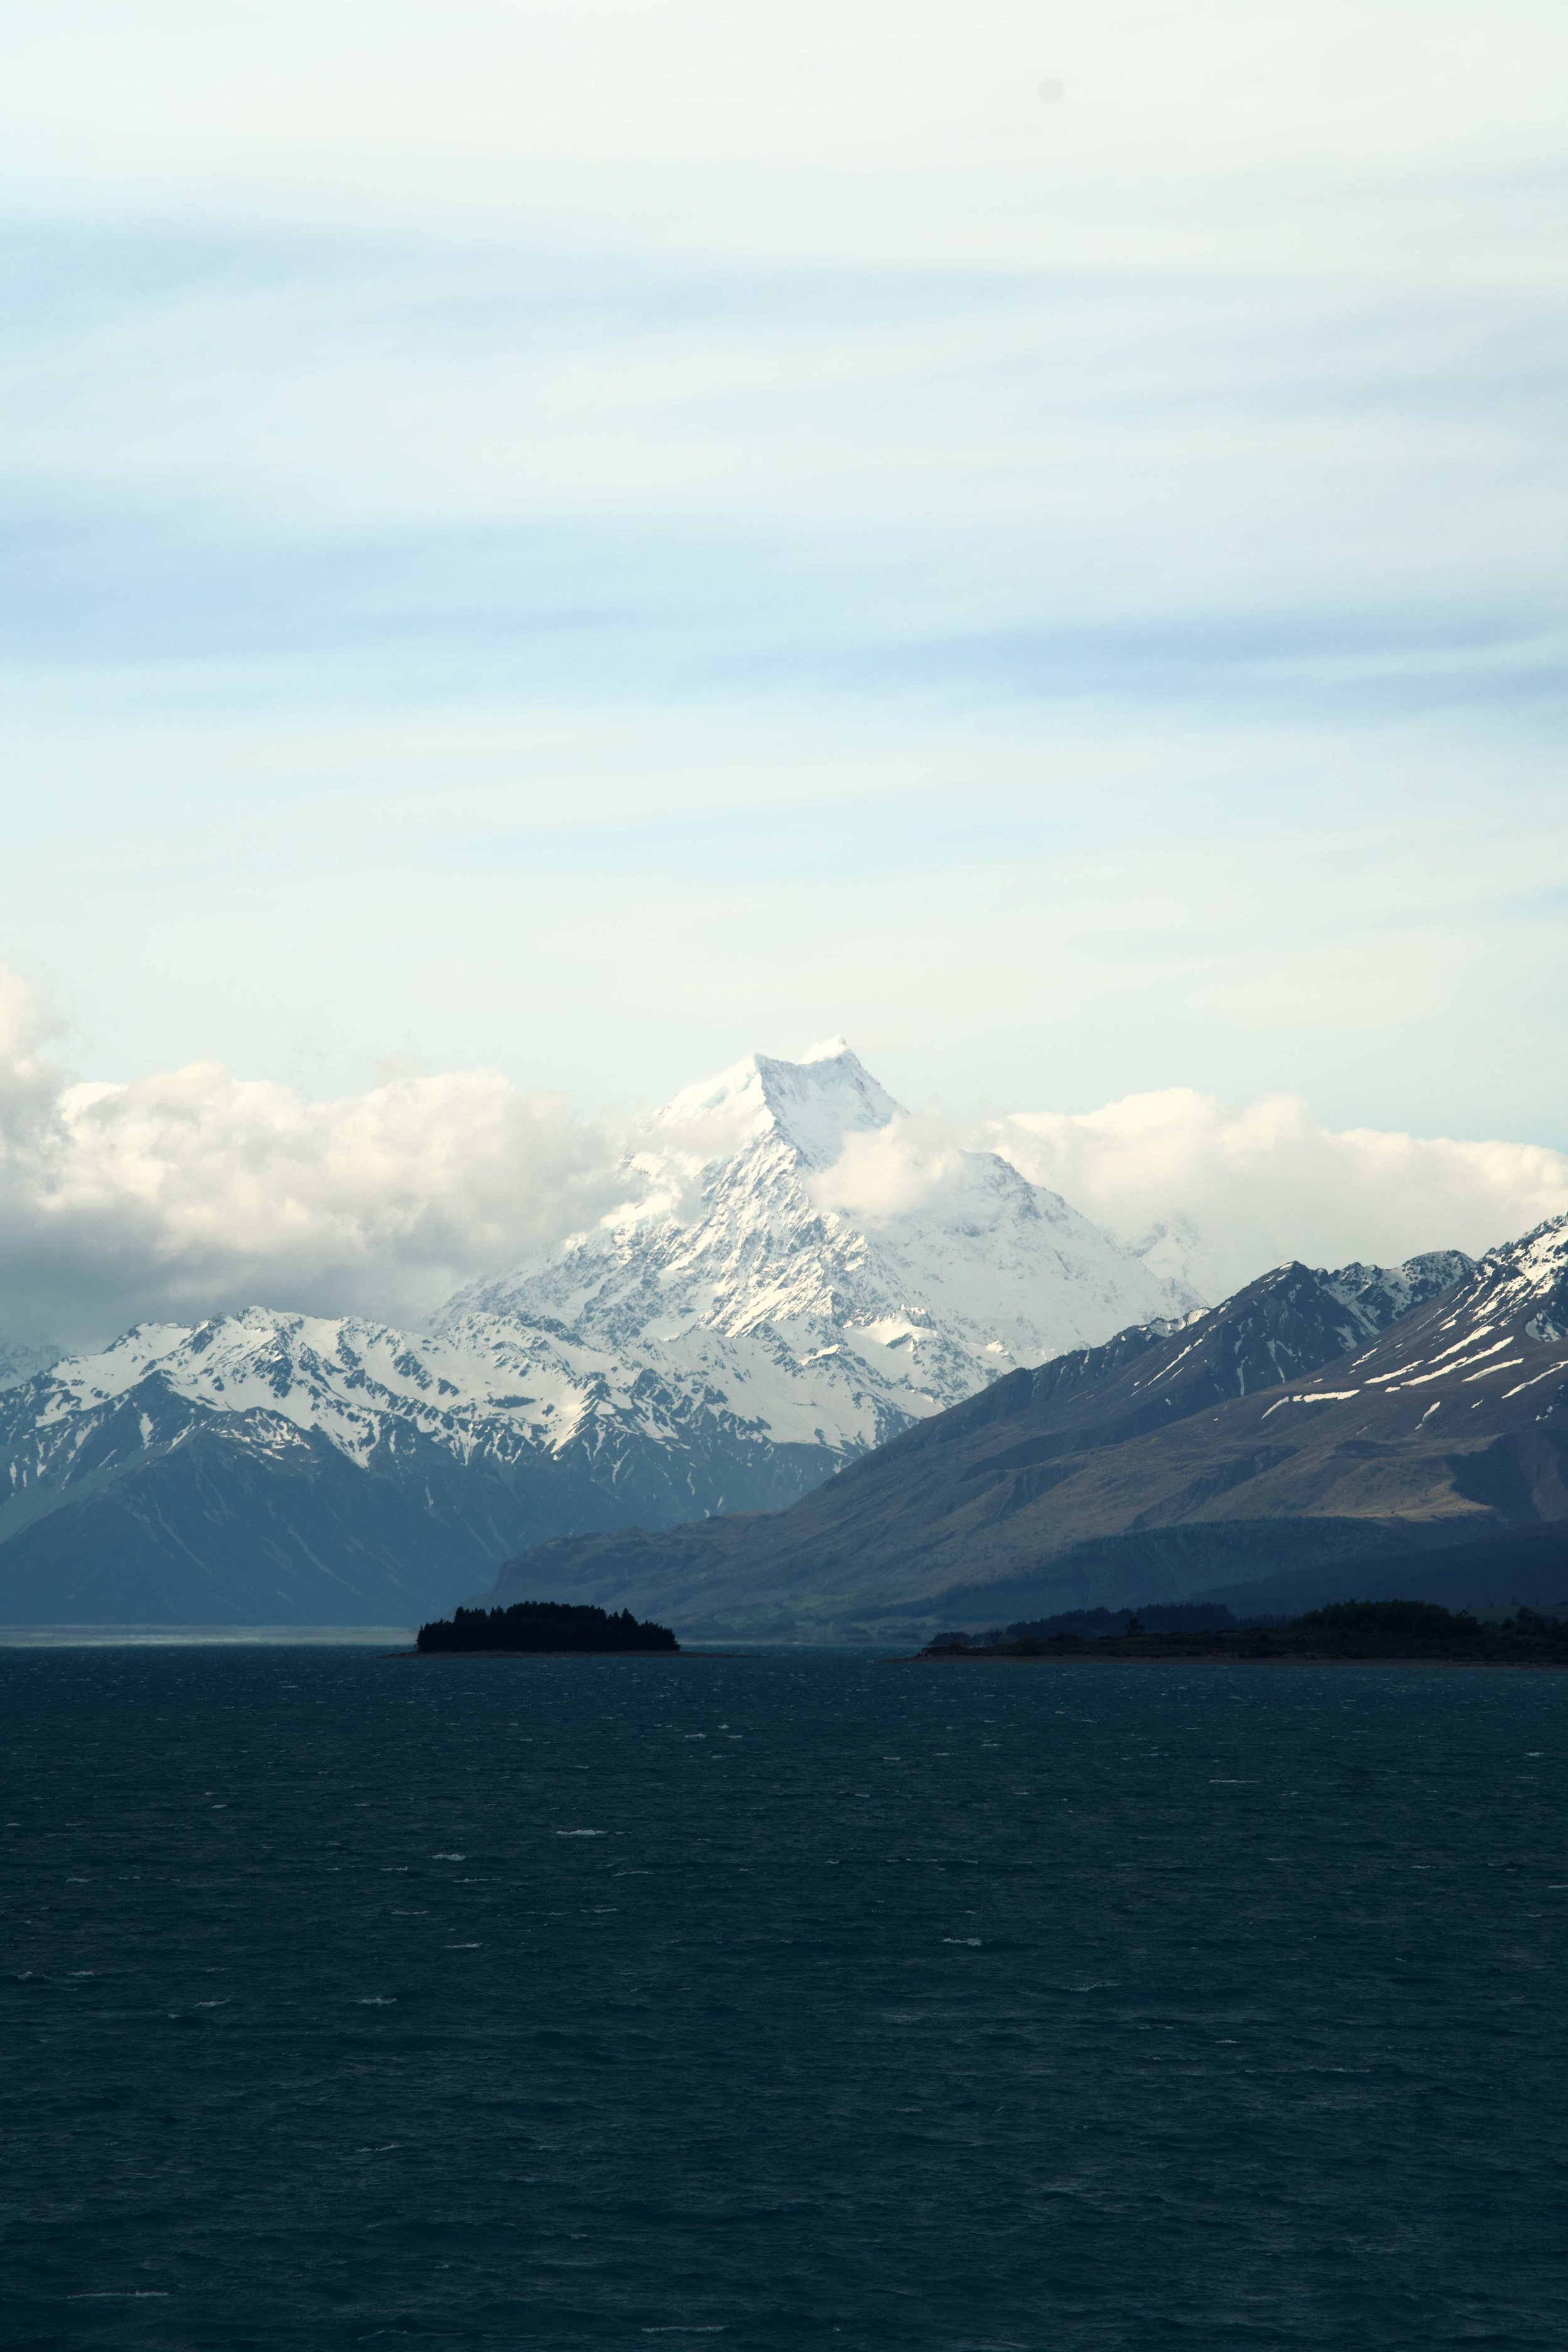
Aoraki Mount Cook from Lake Pukaki
PART TWO:
AORAKI MOUNT COOK NATIONAL PARK
On the way from Christchurch to Aoraki Mount Cook, you’ll start to see the mountains from all angles around the lakes. It wasn’t until we got into Mount Cook village itself that we fully appreciated the size of this landscape. If you have time, we’d recommend spending a few days in this area to fit in walks and hikes. We’ve included easier options with high reward (like the Blue Pools and Hooker Valley trails) as well as steeper climbs (like the Sealy Tarns trail).
Our recommendations for Aoraki Mount Cook are:
If you don’t have your own vehicle on this trip, we’d recommend looking into these tour options:
Day trip from Christchurch to the Tasman Glacier
Day trip from Christchurch to the Hooker Valley Trail
One way transfer from Christchurch to Aoraki Mount Cook
One way transfer from Aoraki Mount Cook to Queenstown
Day trip from Queenstown to Tasman glacier heli-hike
7. WALK TO THE BLUE LAKES AND TASMAN LAKE
Distance: 2.7km return
Time: 1hr return
Difficulty: Easy
The Blue Lakes and Tasman Glacier View walk is a short and scenic walk in Aoraki Mount Cook National Park which takes you to a beautiful view of the Tasman Lake. From the Tasman Glacier Viewpoint, you can also see the Tasman Glacier in the distance, retreating into the mountains. Overall, it’s an easy trail but also has a lot of stairs.
A few hundred metres into the walk, the path forks—one side takes you to the Blue Lakes. There are three Blue Lakes in total, although the second and third are a little harder to reach as the trail is overgrown and less clear. You’ll also be able to see the three Blue Lakes from the trail walk up to the Tasman Glacier Viewpoint.
To get there, park at the Tasman Glacier Carpark (13min drive from Aoraki Mount Cook Village).
The Tasman Lake trail also starts at the Tasman Glacier Carpark, but heads in the opposite direction of the Blue Lakes and Tasman Glacier View trail. The Tasman Lake trail is an easy 3.5km return trail to the base of the Tasman Lake. If you don’t have your own vehicle on this trip, this day trip from Christchurch includes the walk to the Tasman Glacier.
Blue Lakes (Aoraki Mount Cook)
Blue Lakes (Aoraki Mount Cook)
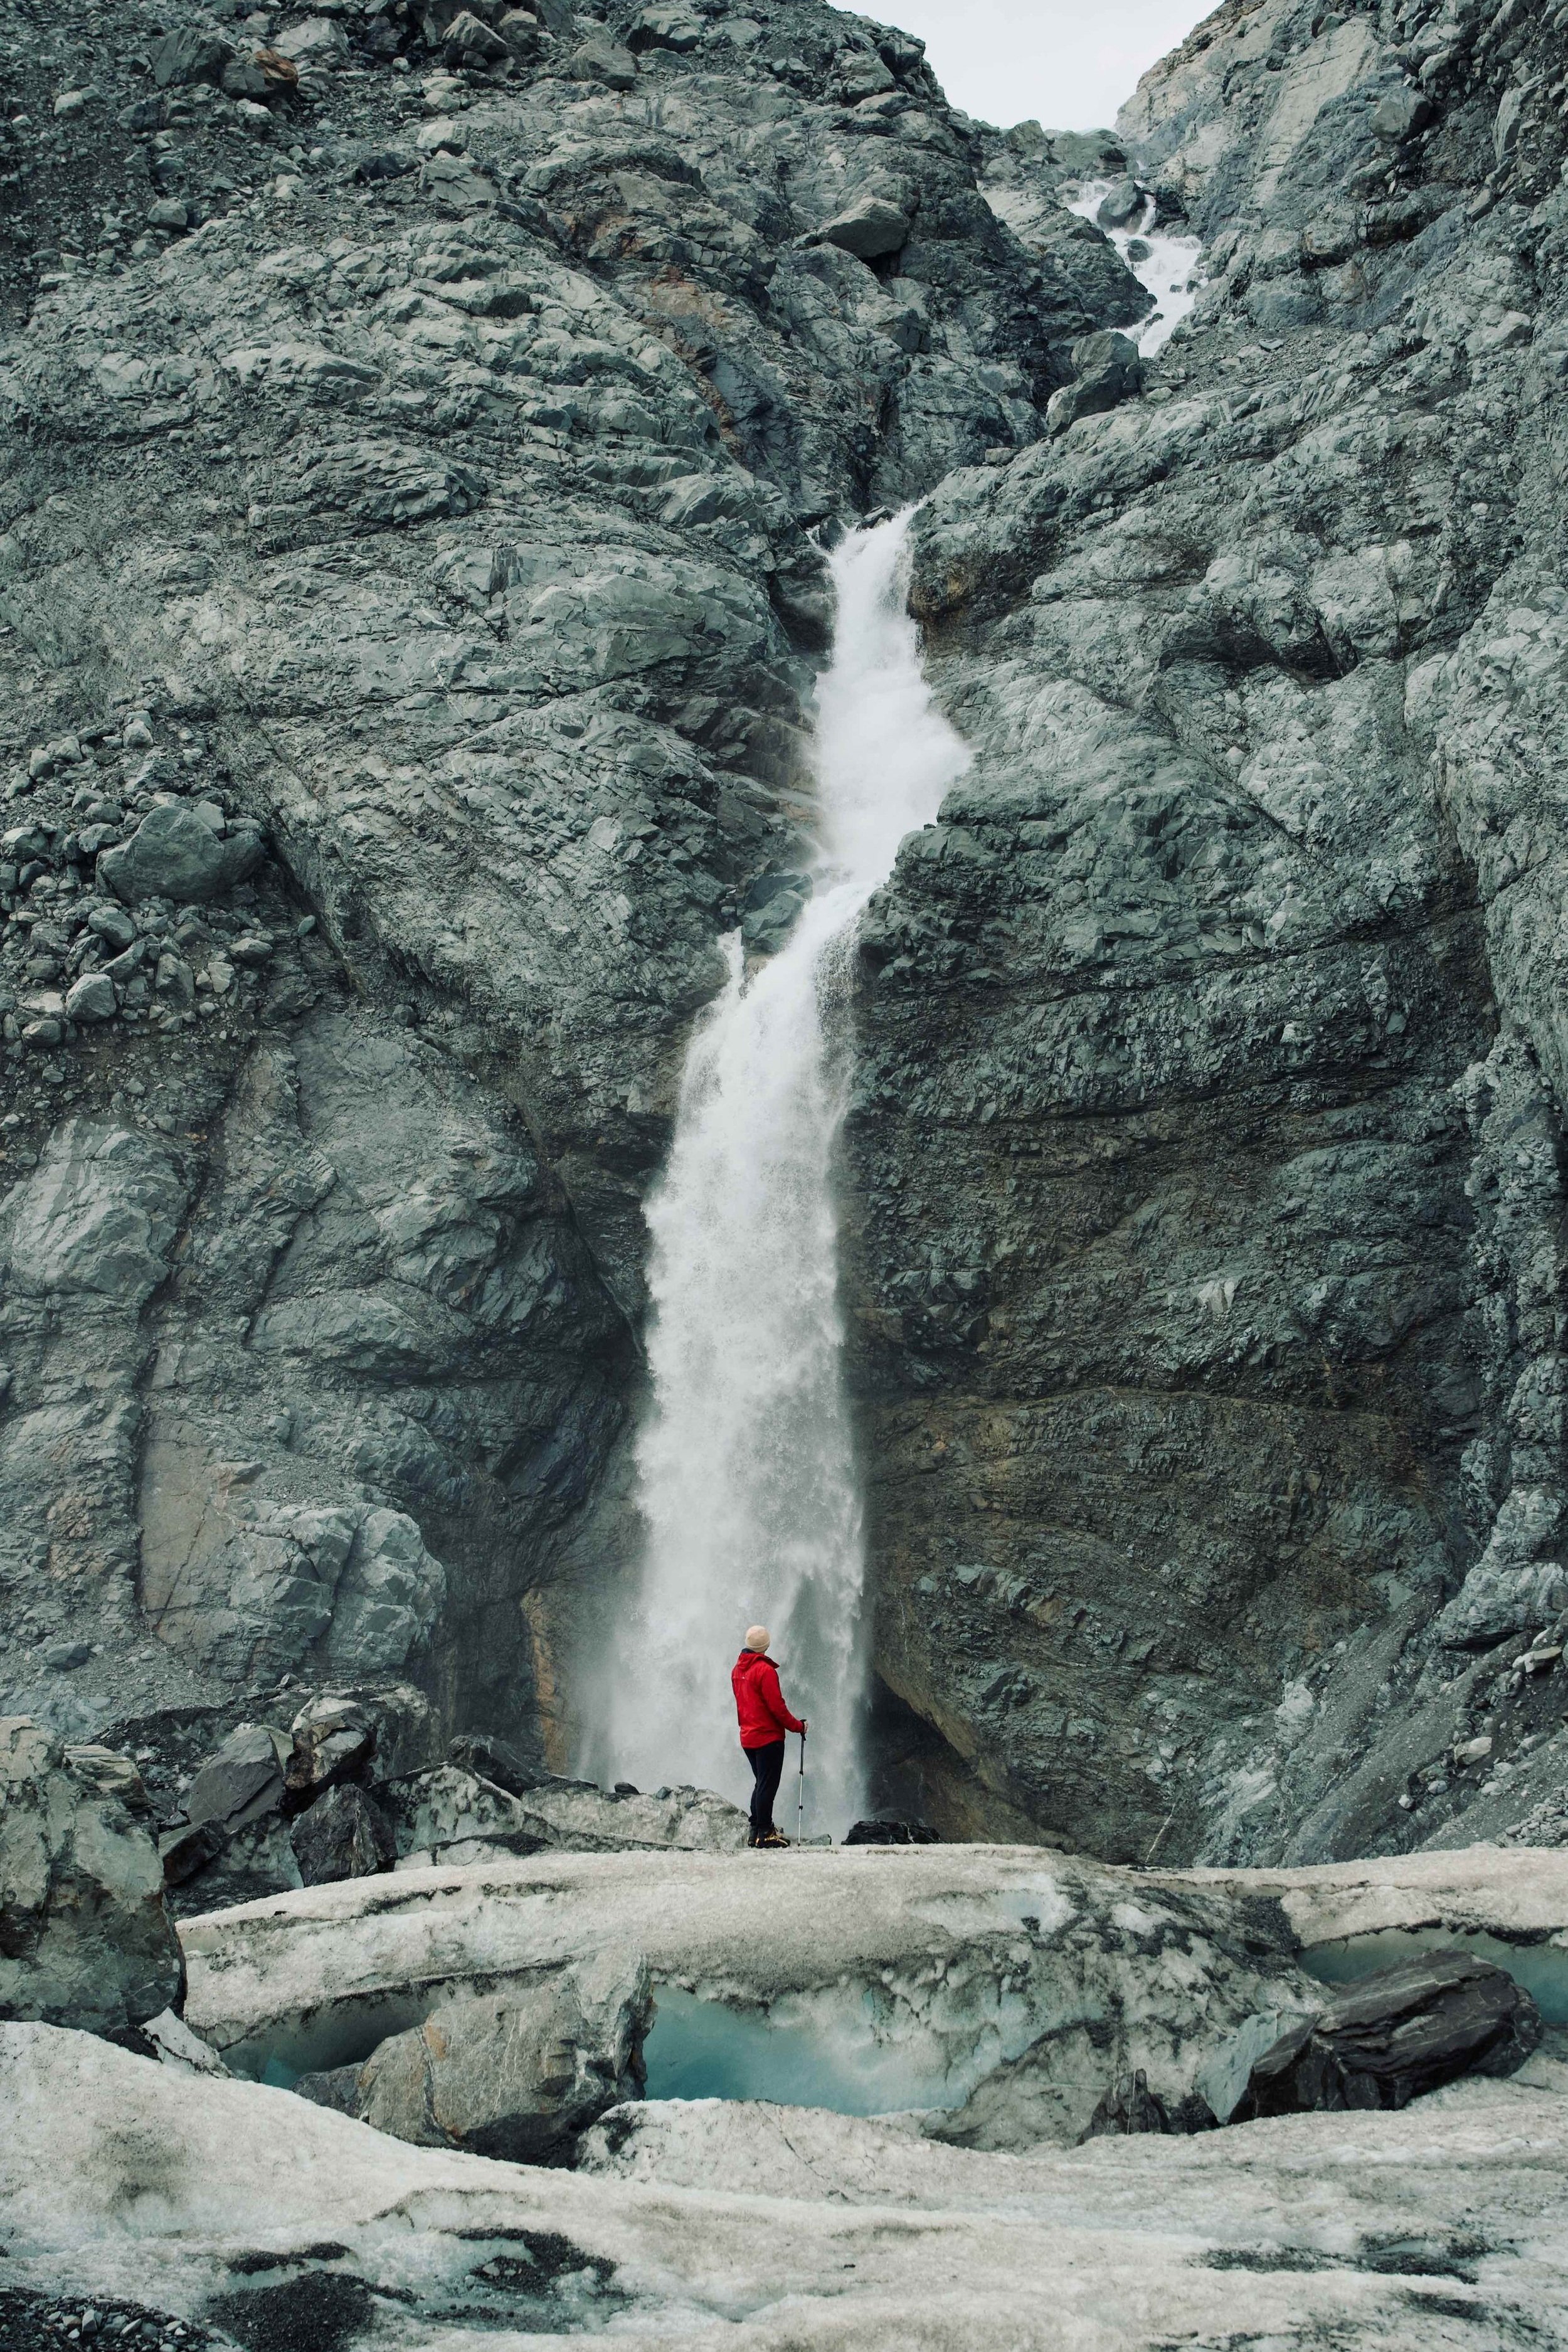
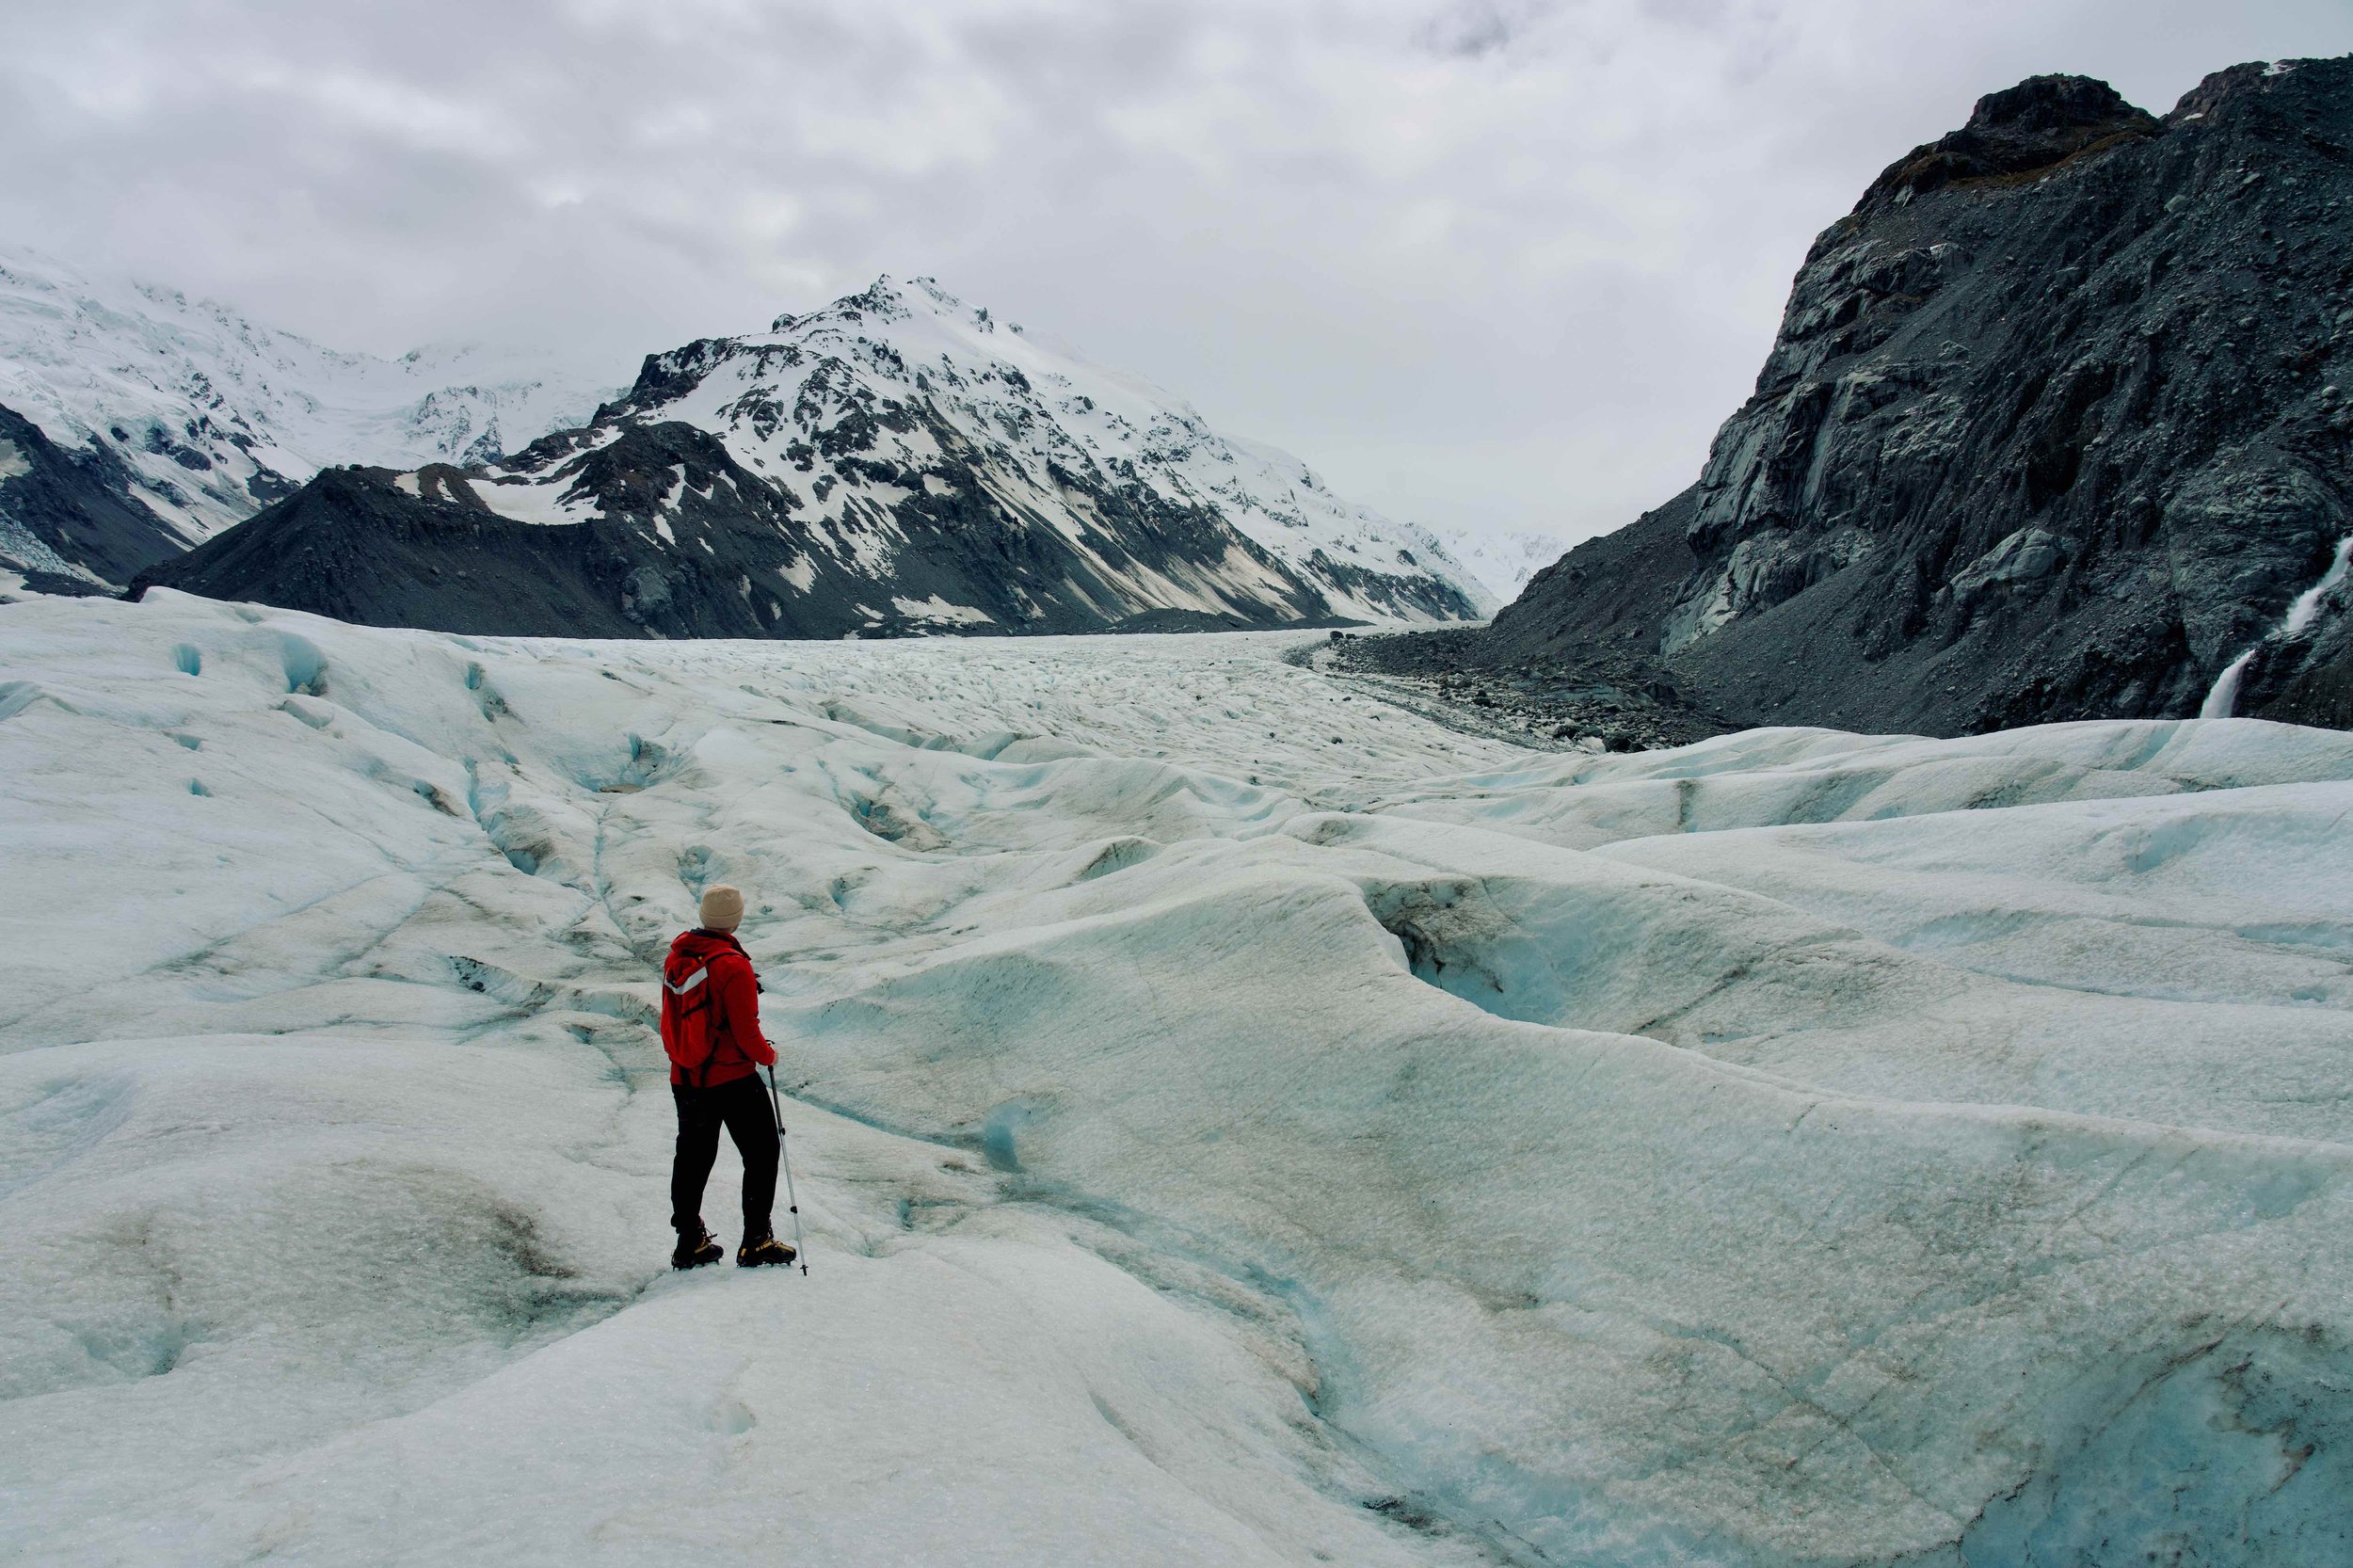
8. TAKE A SCENIC FLIGHT TO A GLACIER
For many days in Aoraki, the clouds were so low that we couldn’t see the mountains. It wasn’t until we left that we heard there could be a very small window to reach New Zealand’s largest glacier—but we’d need to drive back quickly. We booked this three hour helicopter and hiking tour of the Tasman Glacier and landed on a shifting landscape. If you need transport to the region, this day tour offers the same experience departing from Queenstown.
There are around 2900 glaciers in New Zealand, and most of them are located in the Southern Alps on the South Island. The most accessible glaciers are the Tasman Glacier, Franz Joseph Glacier and Fox Glacier. If you were able to take one scenic flight anywhere in the world, we couldn’t recommend these landscapes enough.
Visiting these glaciers made our experience of the South Island so memorable. Every trip is different because the landscape is constantly moving, so if you go, you’ll have a completely unique experience on any given day. We’ve filmed a vlog of our hike here. The recent rain and snow had spilled into huge waterfalls, found its way through cracks in the ice, and opened up deep rivers below the surface. We hiked for a few hours across the top and into blue ice caves.
For other scenic flight options in the area, we’d recommend this 40 minute flight over the Tasman glacier and mountains if you’re in the Aoraki Mount Cook region. If you’re planning to visit one of the other glaciers, this route over the Franz Joseph Glacier and Fox Glacier also includes a scenic landing. If you’re up for more adventure on the surface, you can include a 2-3 hour hike on either the Tasman Glacier or the Fox Glacier. Each of these tours provide all of the equipment needed, including waterproof and warm gear, crampons and hiking poles.

Inside an ice cave on the Tasman Glacier
Waterfalls on Tasman Glacier hike
Hiking on the Tasman Glacier at the base of the mountains of Aoraki Mount Cook
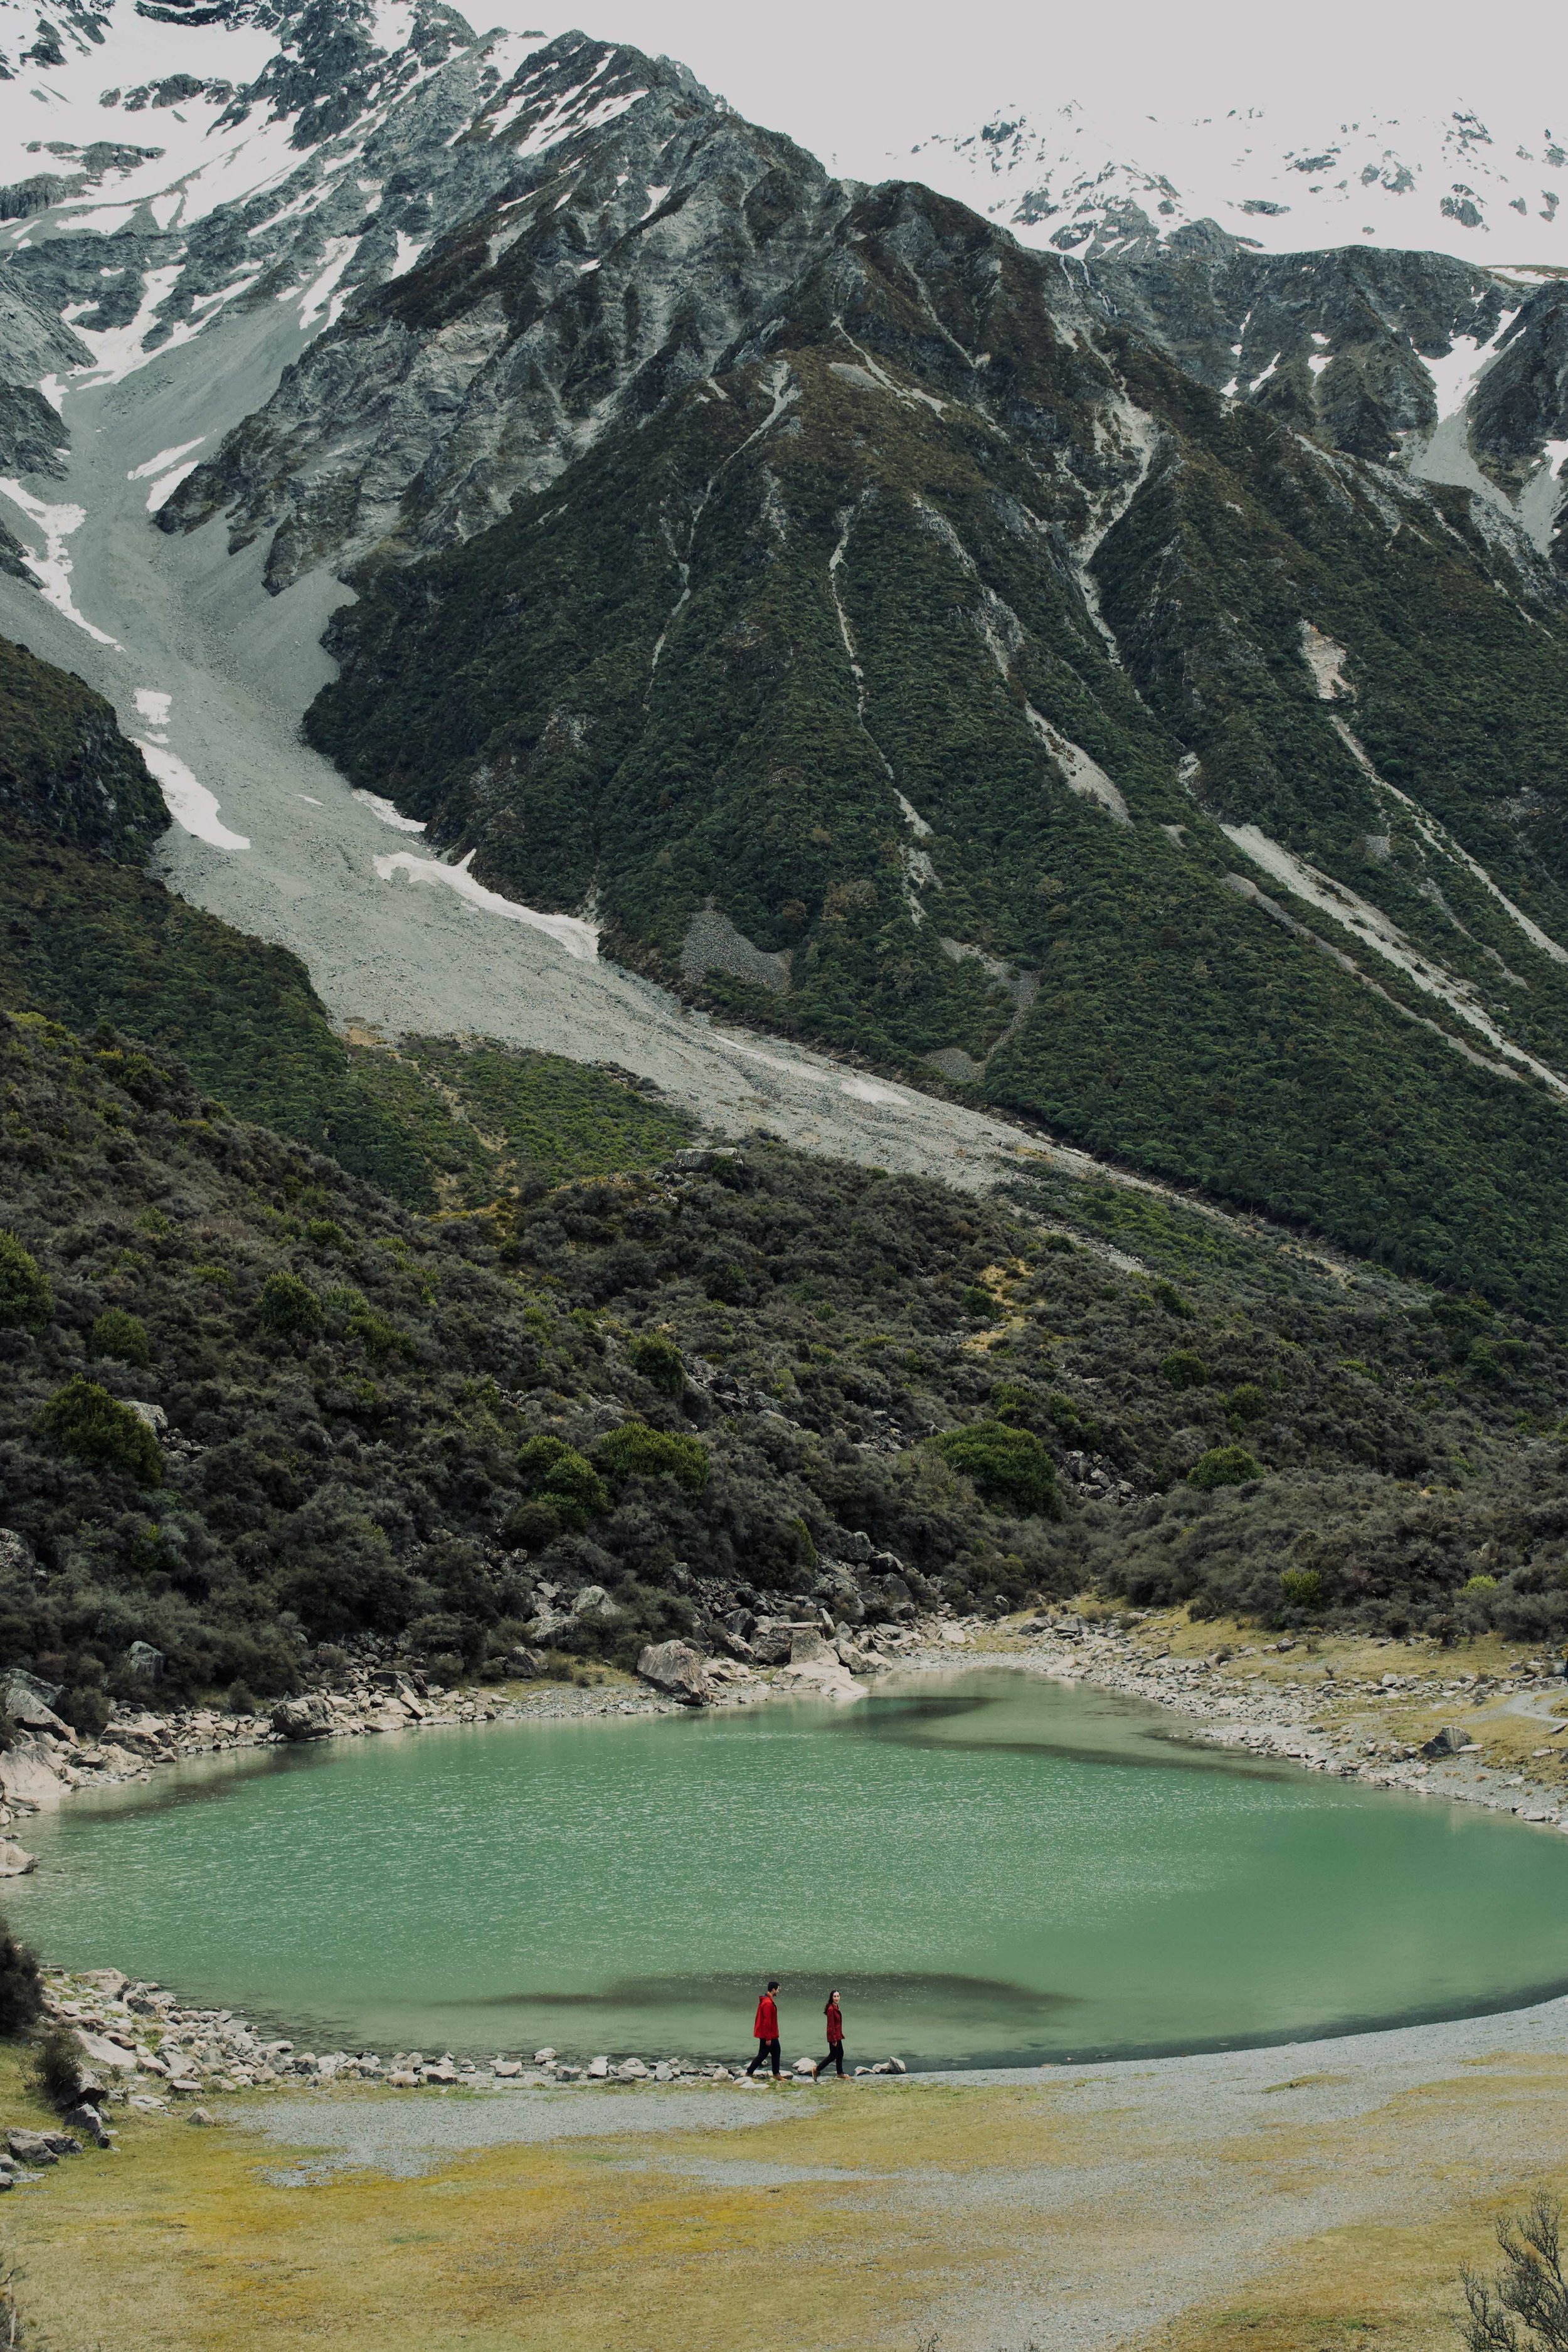
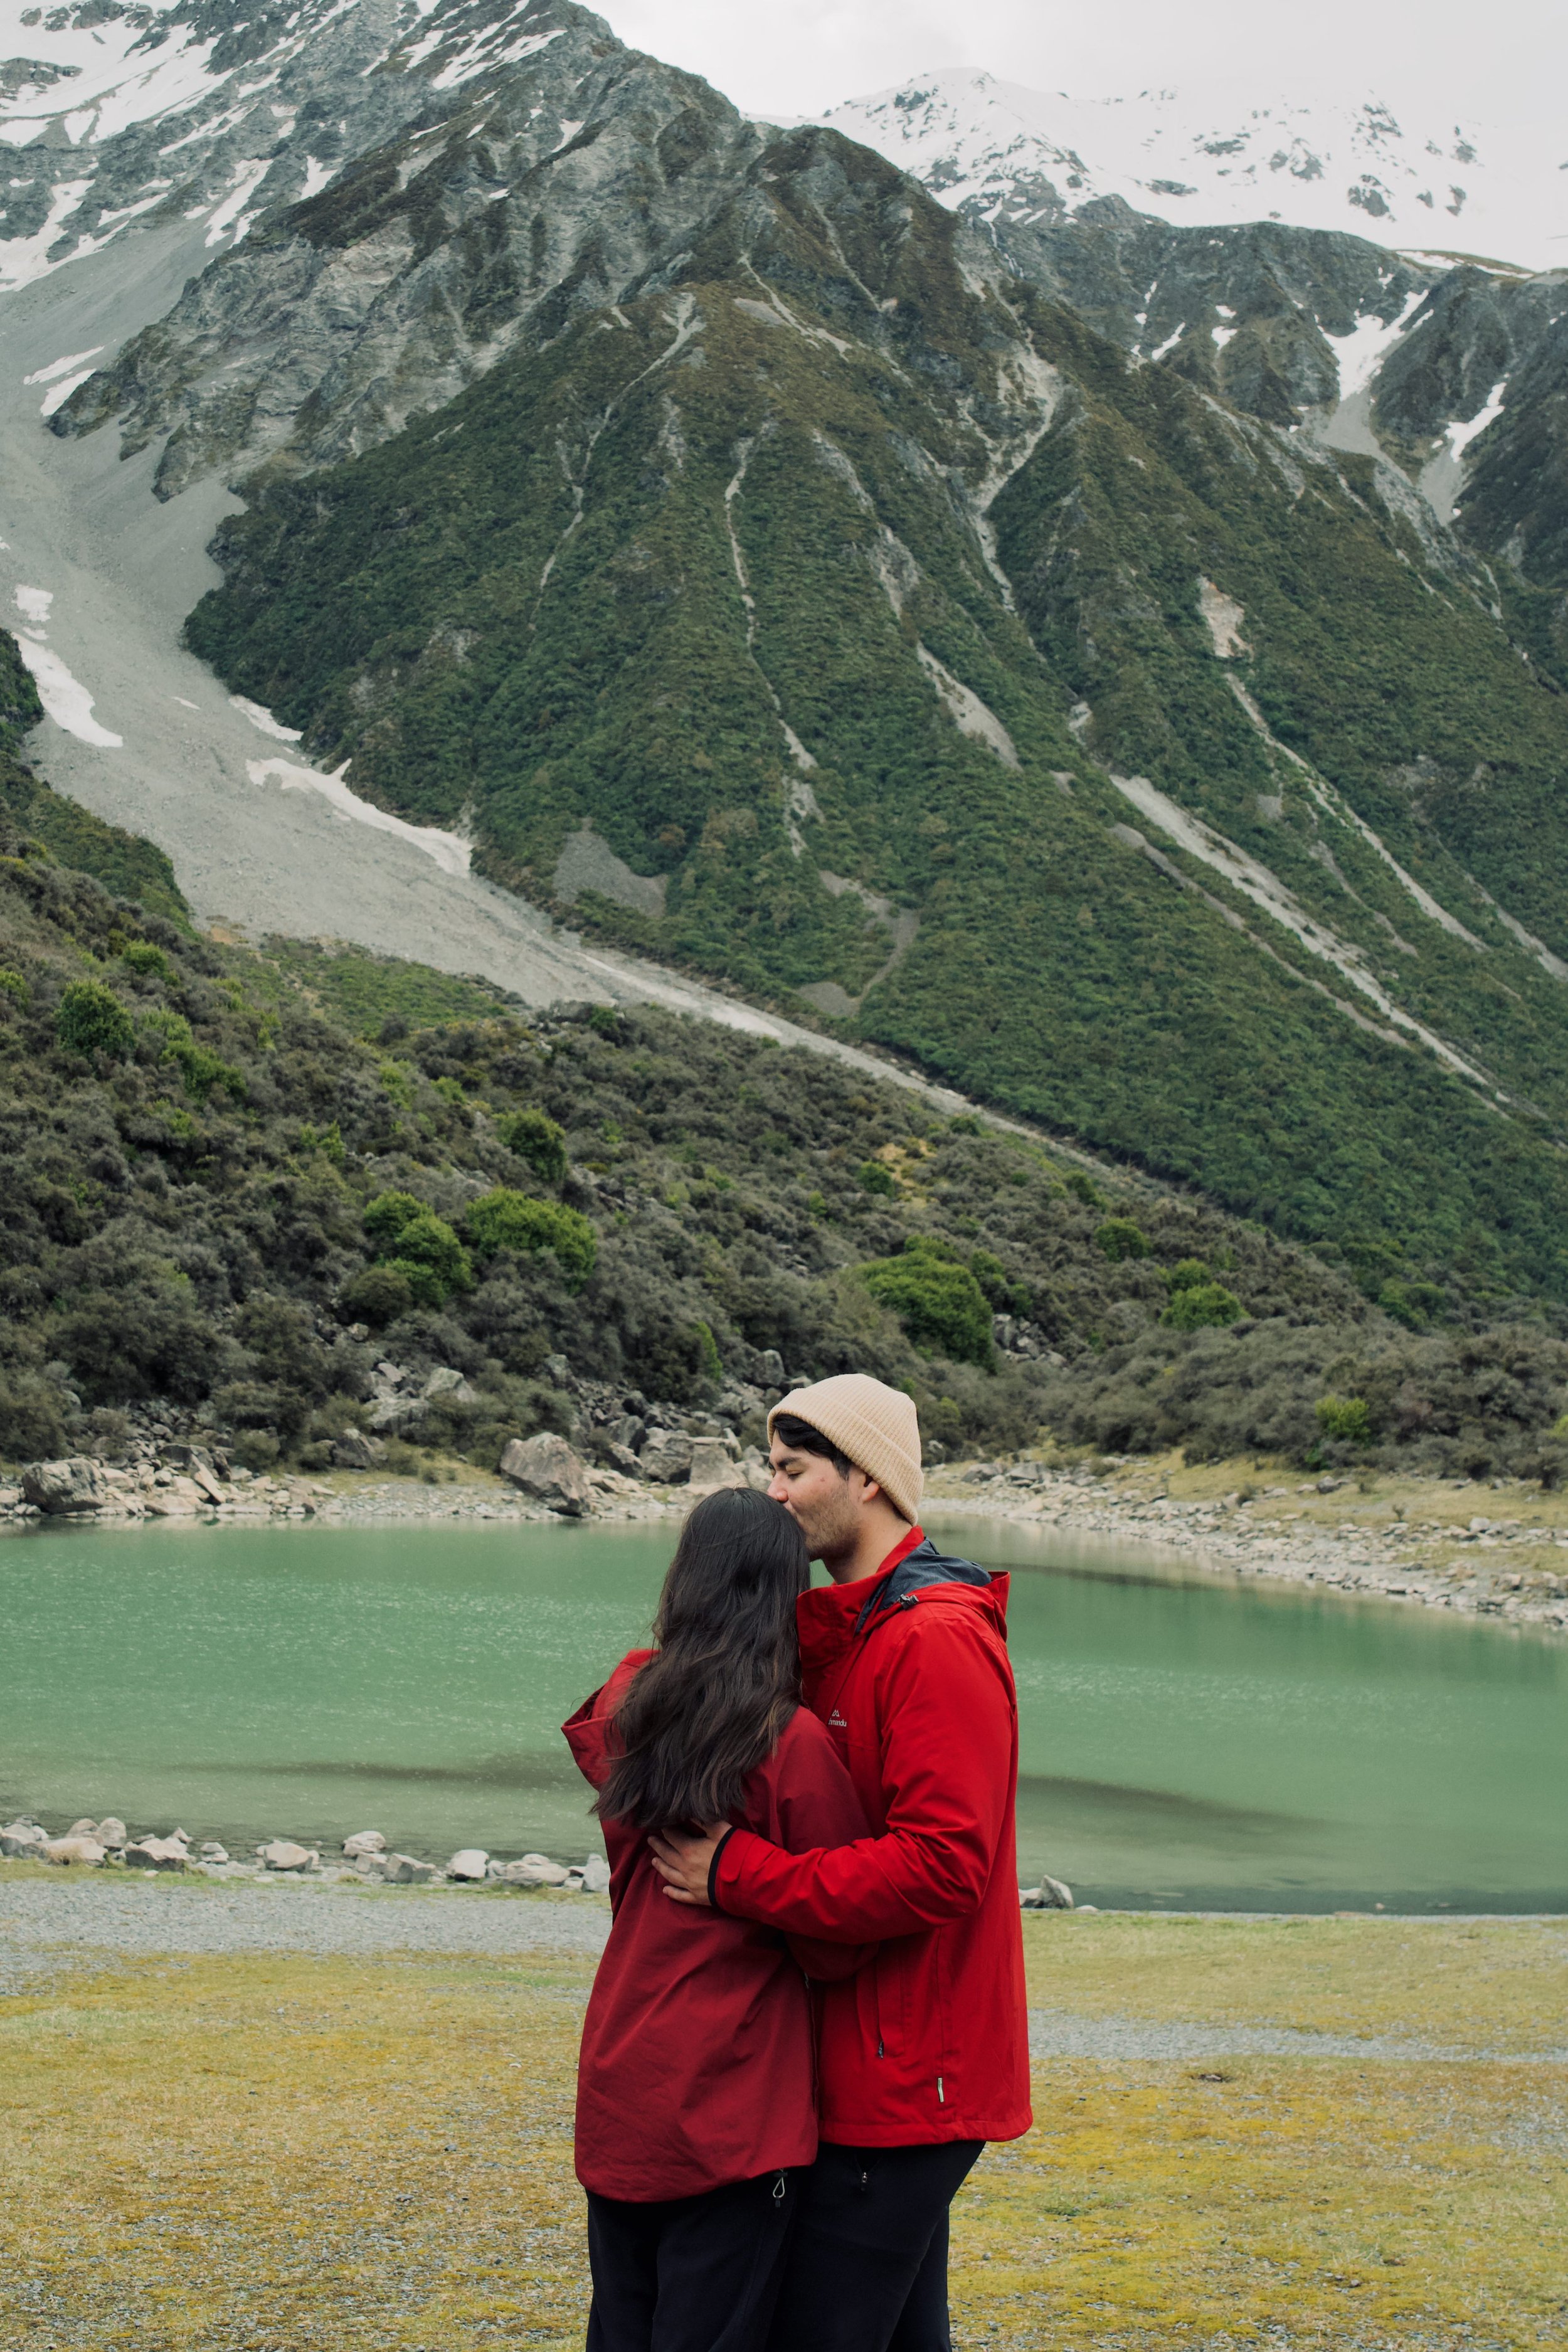
9. HIKE THE HOOKER VALLEY TRACK
Distance: 10km return
Time: 3-3.5hrs
Difficulty: Easy to Moderate
We highly recommend stopping at Aoraki Mount Cook on a road trip from Christchurch to Queenstown. The whole area will be a highlight, and the Hooker Valley Track is one of the best ways to see it. To reach the Hooker Valley Trail on a tour, we’d recommend taking this day trip from Christchurch, or this day trip from Queenstown.
The entire trail is extremely beautiful, passing by Mueller Lake and the Hooker River, crossing three suspension bridges, and ending with icebergs in the Hooker Lake. The end of the trail is the perfect spot to set up for lunch, surrounded by the mountains of Aoraki Mount Cook and a direct view into the Southern Alps, Kā Tiritiri o te Moana.
The track is well-kept and quite easy, but does have some steps and areas of incline. It’s generally pretty exposed, so you should take plenty of water, a hat and sunscreen. A good pair of hiking boots and trekking poles will also come in handy, but aren’t completely necessary. The Hooker Valley Track is also a very popular trail, so expect it to be busy in peak seasons. In summer, the carpark can fill up quickly, but you can always park along the side of the road at the entrance.

Crossing a suspension bridge on the Hooker Valley Track

On the Hooker Valley Track, with the mountains of Aoraki Mount Cook

Wading in the glacial waters of Hooker Lake at the end of the Hooker Valley Track

Hooker Lake at the end of the Hooker Valley Track
10. CLIMB THE SEALY TARNS TRAIL
Distance: 5.5km return
Time: 3-4 hours return
Difficulty: Moderate to Hard
It rained a lot on our second trip to Aoraki Mount Cook. We didn’t want to spend every inside, so we decided to go out into the clouds. We hiked to the Sealy Tarns Viewpoint, which gave us panoramic views of the surrounding alpine landscape and mountain peaks. It was still beautiful in this weather, but on a sunny and still day, the reflections in the water are even more breathtaking.
Admittedly, the Sealy Tarns Trail is challenging. The mountain ascension is 2.5km long with over 2200 steps and roughly 600m in elevation gain. Plan for a longer trail time than usual. Along the way, there are spectacular views of the Hooker Valley and Mueller Glacier. When you climb high enough, you’ll have a perfect view of Muller Lake and Hooker Lake in the distance.
The trail starts from the White Horse Hill campground (the same carpark at the start of the Hooker Valley Trail) and ascends through a series of well-maintained stairs and switchbacks. If you’re staying at the Hermitage Hotel, you can also start the Sealy Tarns Trail from the hotel itself. At both starting points, follow the signs for the Mueller Hut Route.
MAP HERE

Mueller Lake from the Sealy Tarns Trail

Mueller Lake from the Sealy Tarns Trail

Mueller Lake and Hooker Lake from the Sealy Tarns Trail
11. STARGAZE IN THE DARK SKY RESERVE
The night before Ling’s birthday, we drove from Tekapo to Aoraki Mount Cook in the dark. She fell asleep as soon as we arrived. I woke her up again at 3am—it was freezing outside, but the clock had ticked over and I knew she’d want to see the stars.
There aren’t many places in the world that are free from light pollution, and they’re usually located in very remote places. New Zealand’s dark sky reserve is one of the clearest and most accessible areas for stargazing. The reserve is located in the Mackenzie Basin and covers Aoraki Mount Cook, Tekapo and Twizel. We’d recommend heading outside on a clear night with a new moon (or small moon), or booking a stargazing tour in Lake Tekapo with the Dark Sky Project to use their telescopes.

Milky Way from the Dark Sky Reserve
PART THREE:
WANAKA TO QUEENSTOWN
After leaving Aoraki Mount Cook National Park, we’d recommend exploring the area between Wanaka and Queenstown. You can stay in either of these towns to reach some of the most beautiful rivers. pools and lakes on the South Island.
Our recommendations for Wanaka to Queenstown are:
12. SEE THE WANAKA TREE AT SUNRISE OR SUNSET
Wanaka might be our favourite town on New Zealand’s South Island. It’s perfectly placed on the banks of Lake Wanaka and surrounded by mountains. The town’s vibe is peaceful and connected to nature, with great food and plenty of options for things to do each day.
You probably already know about the famous tree in Lake Wanaka—the most photographed tree in the world. It’s easily accessible from a carpark on the lake’s shore, just outside of town but still within walking distance. You’ll see plenty of photographers set up and taking photos. It’s a nice place to just sit and relax by the lake, or even go for a swim.
MAP HERE
We saw the dreamiest colours when we visited Lake Wanaka at sunrise and sunset, and would recommend visiting at these times if you get the chance. One of the best ways to see the area in the sunset light is on a sunset boat trip across the lake. At sunrise, hot air balloon tours leave from Wanaka and float over the largest lakes in the region.
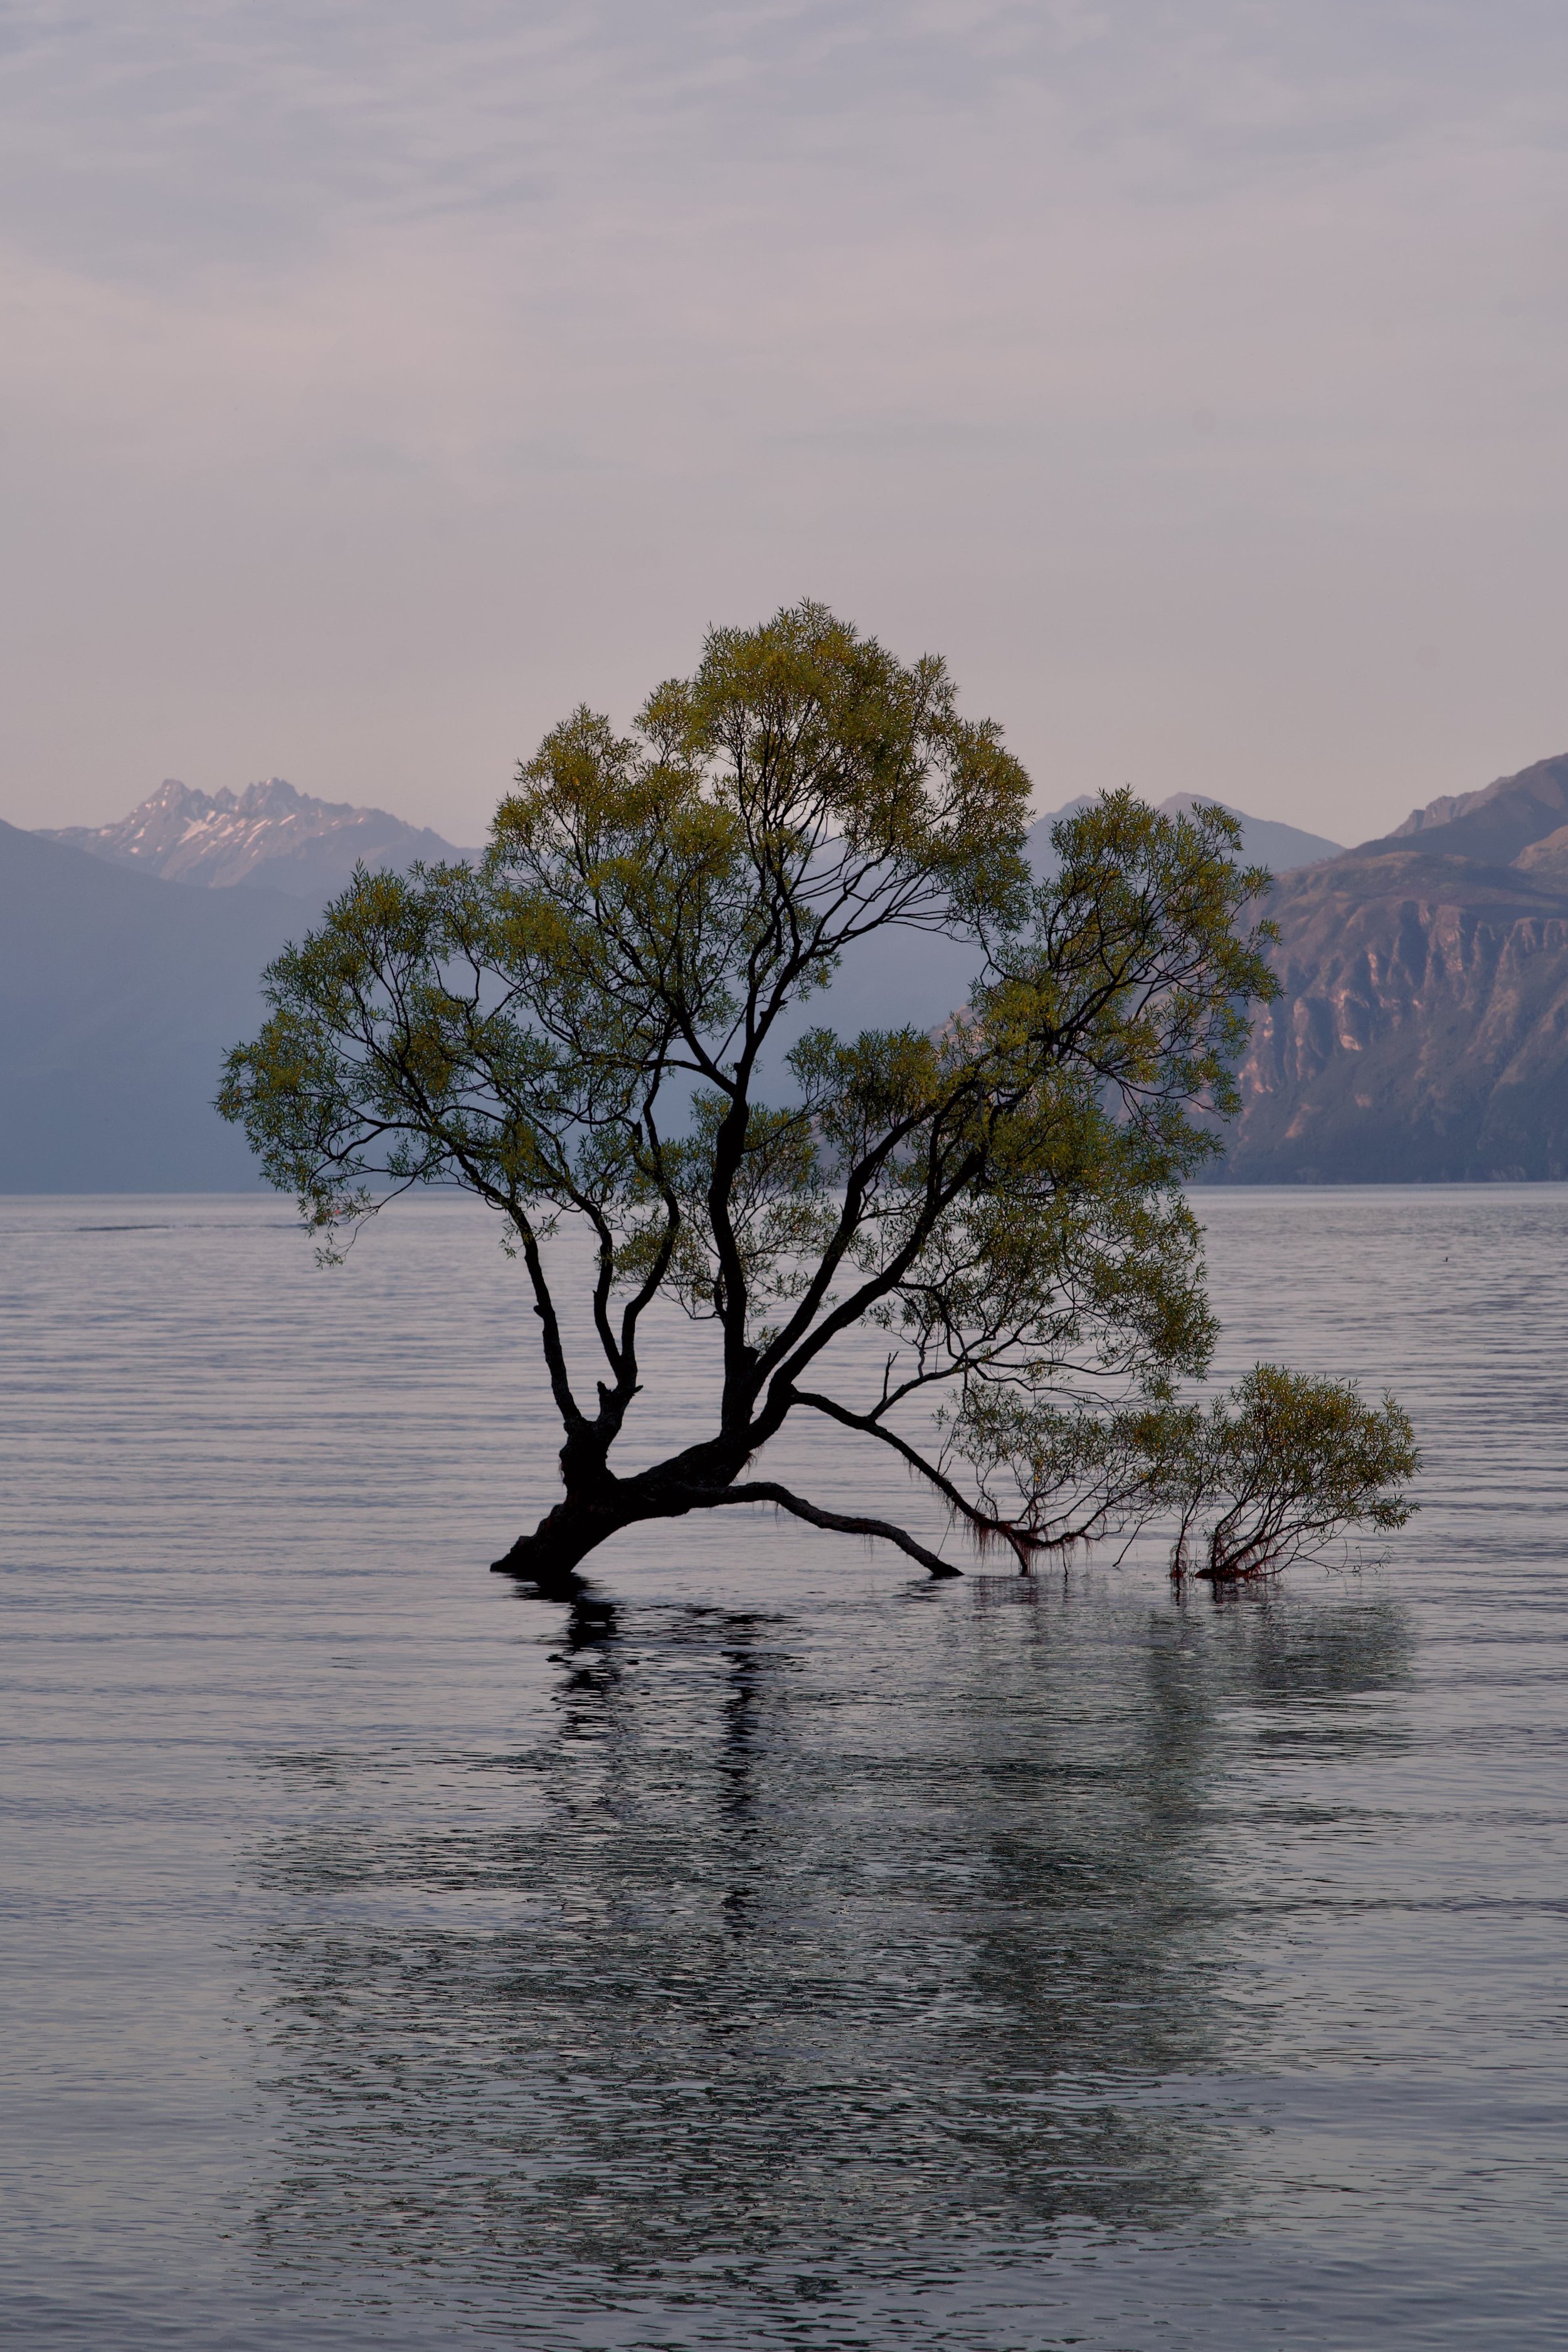
The Wanaka Tree

Lake Wanaka at sunset
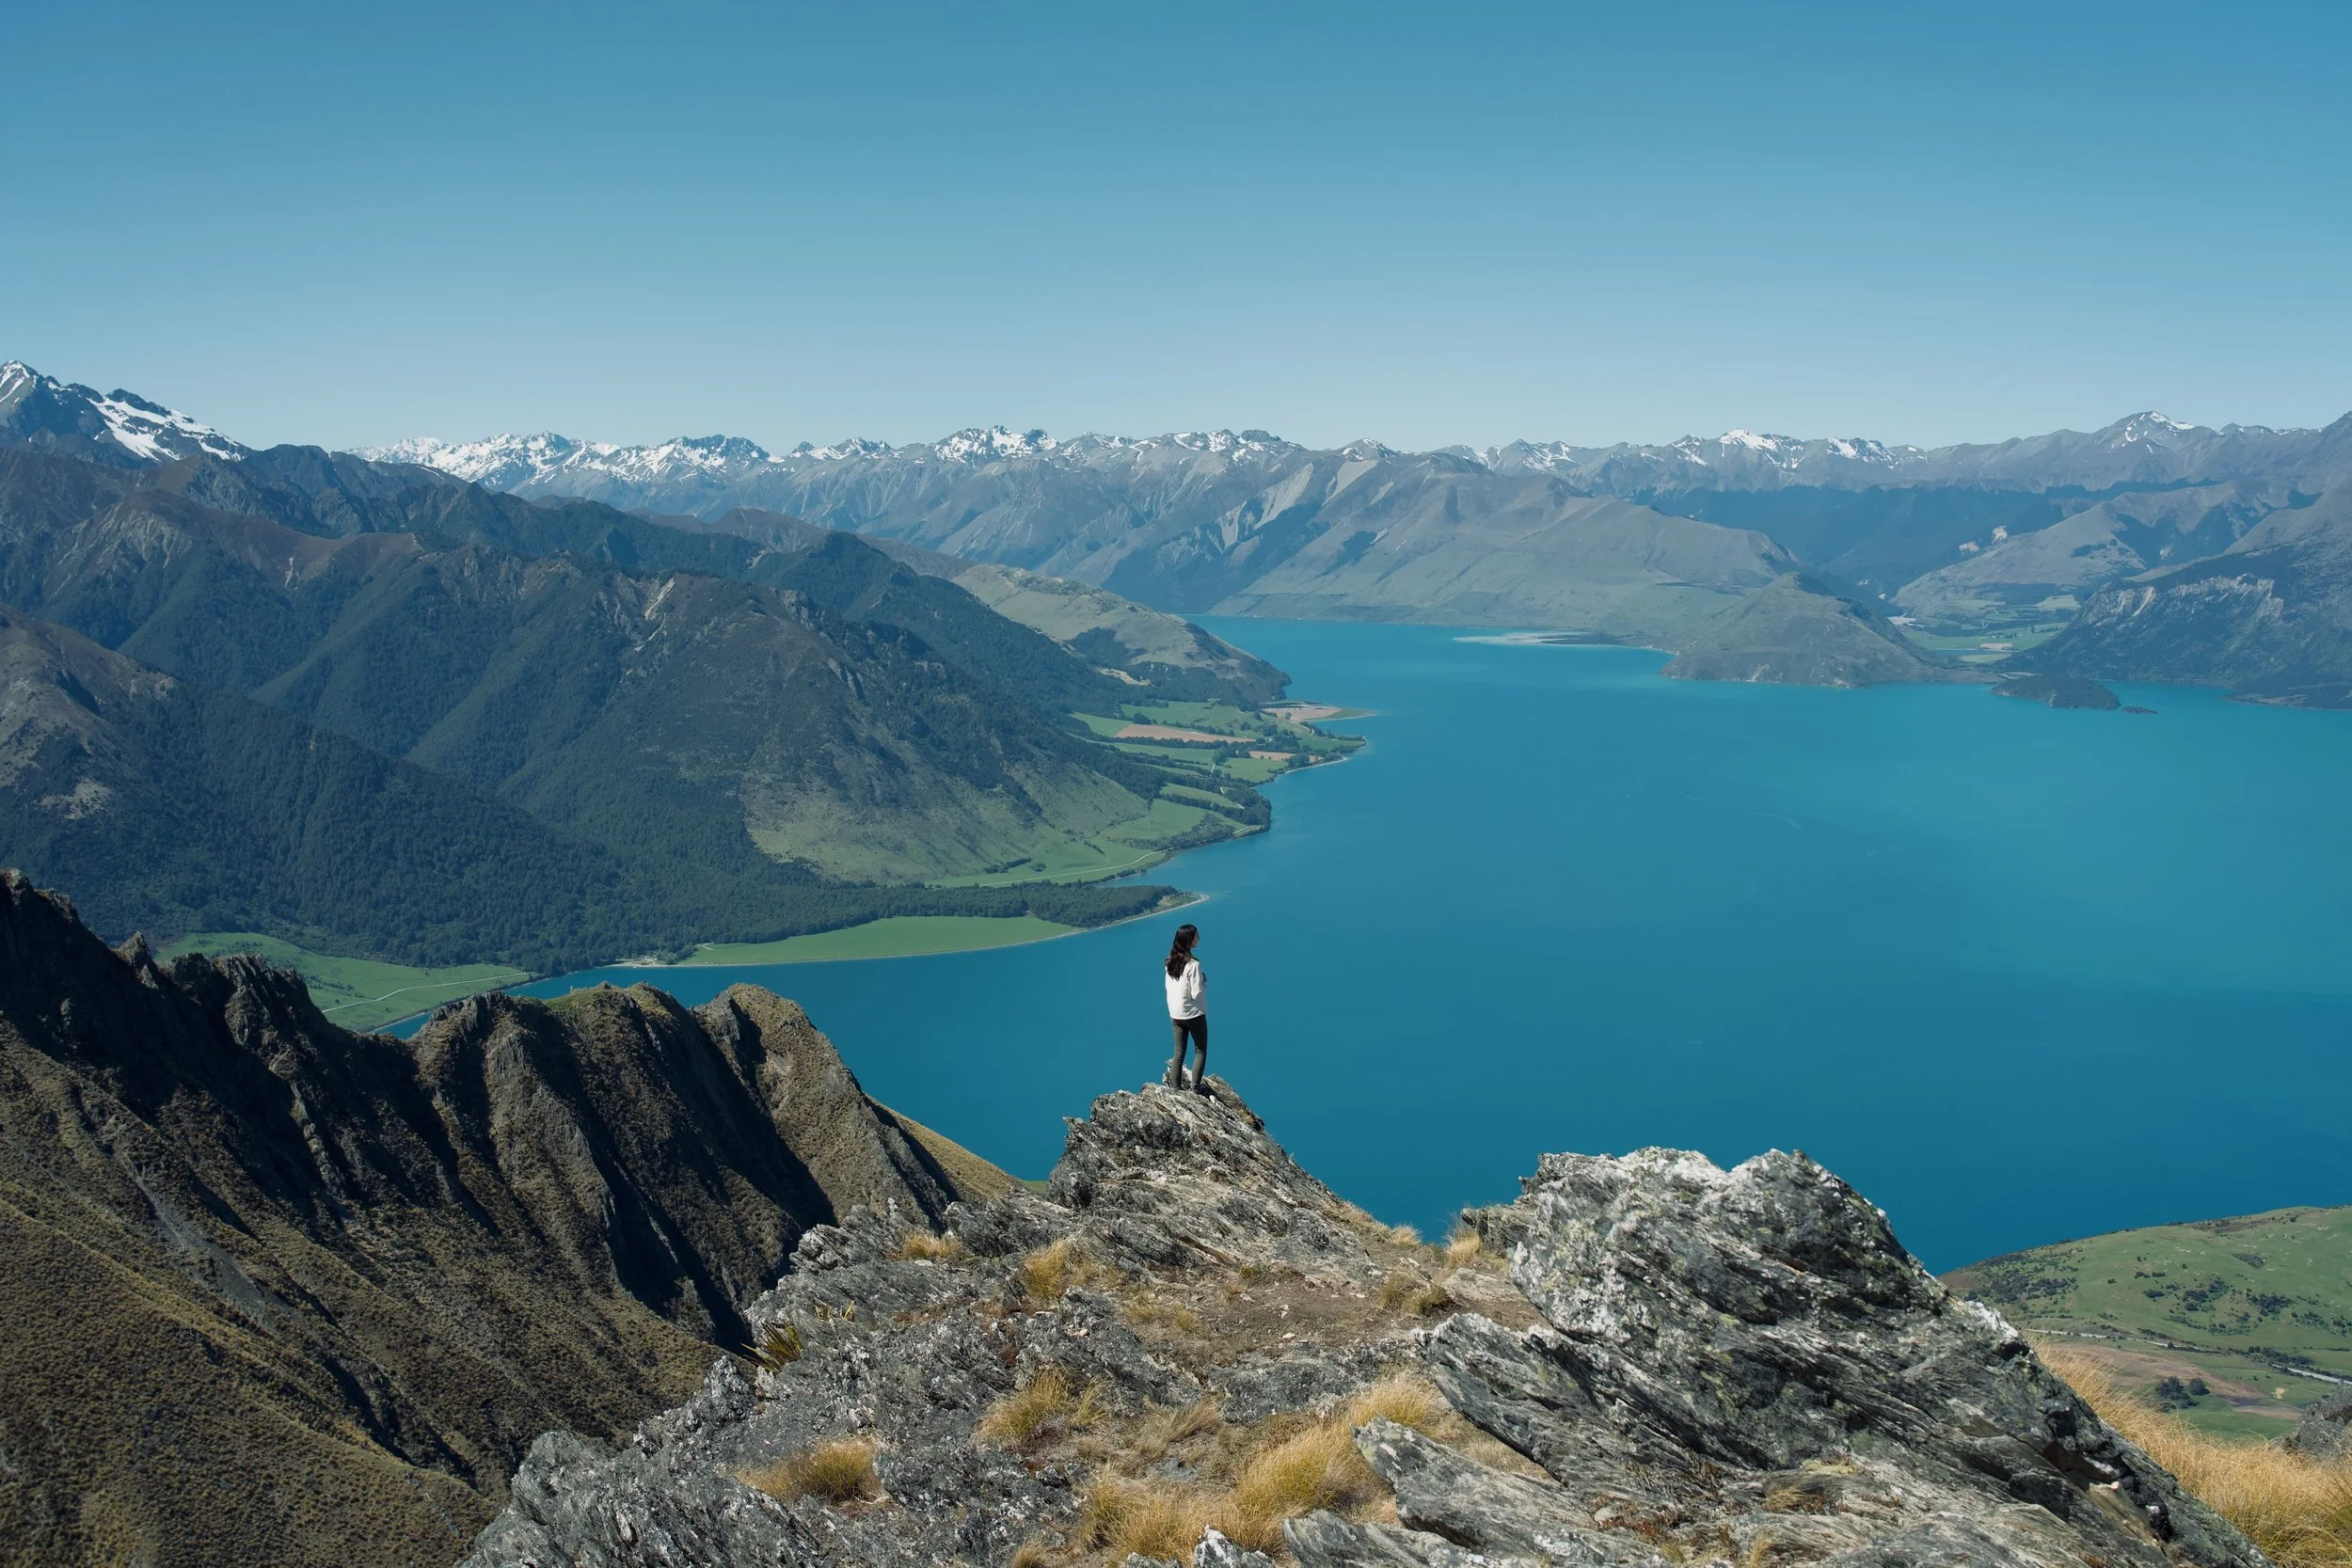
13. HIKE TO ROY'S PEAK
(closed 1 Oct - 10 Nov)
Distance: 16km return
Time: 5-6hrs return
Difficulty: Moderate to Hard
It was still dark when we arrived at the base of the mountains and started hiking up to Roy’s Peak. Sunrise was still an hour away, but the stars were so vivid and clear that we could just make out the lakes in the distance. On the way down, we saw everything again in a completely different light.
The Roy’s Peak track is a highlight if you are anywhere near Lake Wanaka. The views of the lake and the surrounding scenery are so serene the whole way up, only to be topped off with a magical view of mountain peaks at the top.
Roy’s Peak has become very popular, but despite its ‘easy’ rating and the amount of photos you’ll see from the top of the trail, we really think it’s more of a moderate to hard track. It’s 8km uphill and 8km downhill, with no flat ground in between. It’s quite tiring and challenging. You are also fully exposed on the entire hike, so good shoes, plenty of water and sun protection are a must. It can also be a bit windy and cold at the top, so it wouldn’t hurt to bring a windbreaker. And yes, there is unfortunately a line at all times of the day (even sunrise) to get the famous photo at the peak.
There is a small carpark at the base of the trail, and toilets at the start of the trail and the peak (although it’s BYO toilet paper).
The track is closed from 1 October to 10 November each year due to lambing. It’s best to check this conservation website ahead of time just in case. If you’re in the area anyway and in the mood for a challenging track to the peak of a mountain, we recommend the Isthmus Peak track (see below).

The summit of Roy’s Peak

Sunrise over Lake Wanaka from the Roy's Peak Track
14. HIKE TO ISTHMUS PEAK
(closed 20 Nov - 20 Dec)
Distance: 16km return
Time: 6-7hrs return
Difficulty: Moderate to Hard
Isthmus Peak is often listed as an alternative to Roy’s Peak, but in our opinion it’s on a completely different level. The hike is much more scenic and wraps around towering rock faces, with the view changing at every turn. The peak is almost 1400m in elevation and you’ll have 360 degree views of Lake Wanaka, Mount Aspiring and everything in between (even Mou Waho Island).
It’s similar in length and difficulty to the Roy’s Peak Track, but for some reason we felt the elevation more on the Isthmus Peak Track. This is definitely a track to pack food, water, and sun protection, because you’ll be on it for a while. The peak of the Isthmus Peak Track is so still and serene, you’ll want to spend some time at the top. We found it to be a much quieter and less busy track than Roy’s Peak, so there’s no need to wait at any point along the trail.
There’s a small carpark on the side of the road at the start of Isthmus Peak Track. It’s much less obvious than the Roy’s Peak carpark so be on the lookout for a sign for the Isthmus Peak Track, but more than likely you’ll see cars parked along the side of the road. There is also a second carpark a little bit further away from the start of the trail.
MAP HERE
As with the Roy’s Peak Track, the Isthmus Peak Track is closed from 20 November to 20 December for fawning. Check the conservation website ahead of time just in case.
Rock towers on the Isthmus Peak Track

Lake Wanaka from the Isthmus Peak Track

Mountain view on the Isthmus Peak Track

Terrain at the top of the Isthmus Peak Track
15. RIDE AROUND LAKE HAWEA
Next to the famous Lake Wanaka, Lake Hāwea is very underrated. It quickly became one of our favourite places on our road trip from Christchurch to Queenstown because it is so peaceful—the lake was formed by an ancient glacier and has very tranquil, blue water.
There are so many places to stop around Lake Hāwea and it can easily be seen by driving. We’d recommend stopping at a lookout at the southern end called Old Tree, where you can see across whole lake from the hill. There is a carpark at the entrance to the area (MAP HERE).
If you want to make the most of the area, this bike tour is one of the best ways to travel around Lake Hāwea and Lake Wanaka together. It’s a self-guided trip so you can take your time along the 30km route (starting on the same side of the lake that we’d recommend visiting), and offers transport to and from the bike route.

Sunset lighting around Lake Hawea
View of Lake Hawea from Old Tree lookout
16. SWIM IN THE BLUE POOLS OF MOUNT ASPIRING
Distance: 1.5km return
Time: 30-40 minutes return
Difficulty: Easy
The Blue Pools Walking Track is one of the easiest trails in Mount Aspiring National Park and leads to striking blue pools in the Makarora River. This track is a short and family friendly trail that’s perfect on a sunny day. It’s about an hour’s drive from Wanaka, and two hours from Queenstown.
Most visitors walk to the suspension bridge and have lunch by the banks of the pools, but the trail does run much deeper into Mount Aspiring National Park. A lot of people also jump off the suspension bridge into the water below—we’d guess it’s at least a 10m drop. If you don’t want to jump, you can swim into the pools from the banks, but be warned that the water is absolutely freezing all year round.
There’s roadside parking at the start of the trail (MAP HERE).
Also, the sandflies around the Blue Pools are relentless, so we’d recommend taking insect repellant and wearing long sleeved clothes—anything to cover your skin. You can thank us after.

Suspension bridge on the Blue Pools Walking Track

Blue Pools (Mount Aspiring)

Swimming in the Blue Pools

Sand bank in the Blue Pools
17. STOP AT LAKE OHAU
New Zealand’s South Island is the perfect place for a road trip because the drive itself is so beautiful. We’re not exaggerating when we say that we were constantly pulling over. Lake Ōhau is one place that we’d recommend stopping at on your way to Wanaka and Queenstown.
The side of the lake changes a lot between seasons—sometimes with thick flower fields or tall yellow grass.

Flowers on the bank of Lake Ohau

Car window view at Lake Ohau
18. SAIL TO MOU WAHO ISLAND INSIDE LAKE WANAKA
Lake Wanaka is one of the largest glacial lakes in the Southern Alps of New Zealand. It’s 45km long and several hundreds of metres deep. There are also many islands within the lake, and one of them—Mou Waho—has another lake at the top of it. Mou Waho can only be reached by boat, and we took this water taxi tour to get there. Our guide was very informative on the way to the island, provided a trekking pole, and gave about 45 minutes to explore Mou Waho when we arrived.
It’s a short, uphill walk to reach three viewpoints; one at the banks of the island’s lake, one at the top of the rock hill overlooking the lake, and one which looks down Lake Wanaka towards Mount Aspiring. It won’t take longer than 15 minutes to get to the furthest point, but the walk is all uphill. From the viewpoint at the top of the rock, you can also catch a great view of the lake on Mou Waho surrounded by Lake Wanaka.
If you want to see more of Lake Wanaka and reach panoramic views, we’d recommend taking this tour which includes a water taxi, 4x4 drive, and a climb to a picnic high above the lake. Otherwise, if you’re interested in seeing some of the other islands inside the lake, look into this tour to Ruby island or this tour to Stevensons Island for nature walks on those islands.

Mou Waho Lake (Lake Wanaka)

Sailing to Mou Waho (Lake Wanaka)

Mou Waho Lake (closest) and Lake Wanaka (background)
RECENT POSTS


PIN IT

Find us on Instagram